Search the Community
Showing results for 'create bootable grub2 image'.
-
I've recently dusted some of my old DOS games, and have been using Dosbox to run them for a while now. I eventually got tired of switching disks around, and decided to create images of them and use Dosbox's internal IMGMOUNT feature. This works fine with the BIN/CUE pairs ImgBurn creates for the mixed-mode disks, but the size of the images was larger than I had expected or was willing to make room for. Most of this space is used by lossless CD-audio tracks in the disk, and after poking around a bit on the Dosbox wiki, I found a way to use lossy mp3 or ogg tracks instead of the orginals using Cuesheets. To do this with Dosbox, each track needs to be in a separate file. I was able to create the files for the audio tracks using standard CD-ripping software. Creating an image of the data track was a problem. It would definitely make ImgBurn more valuable to me if it were able to create an ISO file from a single track on a multi-track CD, or, if it already can, make it clear that this is an option.
-
Is it in good enough shape to release as a public beta? Perhaps you could create a public beta forum which wouldn't pollute the beta team's forum (assuming your have one) with n00b noise? Just a thought...
-
I like to keep things simple, and be consistent, so I ALWAYS rip to .iso. Iso is my file type of choice for images of dvds and cds. I recently updated imgburn, and am wondering if this has something to do with the latest, it tries to force me to rip my cd to .bin. But I don't want a bin, I want an iso, like every other damn file I've been ripping. When I select iso, the thing gets all yoda on me and says I was trying to fool it, but it can't make an iso, and instead will make a bin. I don't want a damn bin, I want a damn iso. Iso is a valid format for an image of a disc, so why in the hell is your program suddenly so unable to create one?
-
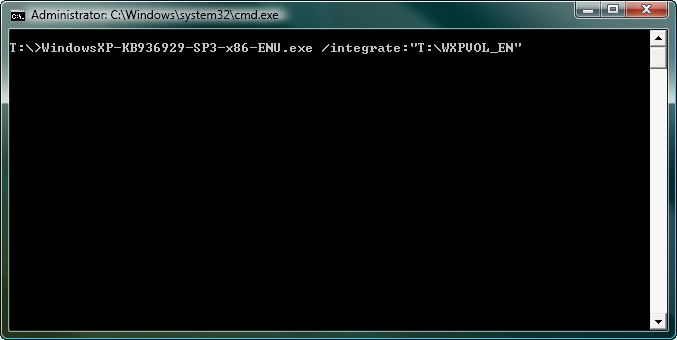
For users running Vista or Win 7 the following command sequence might work for integrating XP SP3: Set __COMPAT_LAYER=WinXP WindowsXP-KB936929-SP3-x86-ENU.exe /integrate:"T:\WXPVOL_EN" Set __COMPAT_LAYER= Tested on a Win 7 x64 RC host using as a source a XP Pro SP1 OEM install CD, please note that only the OEM key has been checked.
-
 In Windows 10 I created the recovery station on USB. Looking into the content I found that this recovery station is meant for UEFI. This is new for me, as I am used to use ImgBurn to create ISO images using Microsoft bootfiles to make an image a bootable ISO file. So I need to know what files (and/or settings) I have to use to make this image bootable as I only could find this location on the recovery station for any boot related files './EFI/Boot/bootx64.efi'. Do I need this one and if not, then what do I need to make this image a bootable ISO image file using UEFI? Are there any other settings too that need to change as well for UEFI? B.t.w, I found a manual 'here', at the 'advanced' tab you'll find the 'bootable disc' section to choose 'Make image bootable' and then you have to choose Boot image location, Platform ID, Load segment, sectors to load.
 -
Hi Unfortunatelly I could not find out how to burn multisession CDs/DVDs. I mean how to burn few pictures to a CD/DVD on Monday and how to add another few pictures few days later onto the same CD/DVD. Please help. Thanks in advance. Ruedi
-
In IMG Burn, when I get to Create Layer Break Position I get 21 suggested layer breaks and all are with the silver star ( Average). How do I know which one to pick? Can I use the Padding or % info to pick one? I burned a dual layer disc yesterday and selected a arbitrary position from the 21 average listed and even though there were no errors, retrys, etc., with a successful recording message, when I played the DVD it had slow, stuttering playback for about 2-3 minutes after about 30 minutes, then the movie continued perfectly with no problems. Usually I get one of the stars and select the best one - never have had a problem before. Any help suggestions would be appreciated.
-
 I've tried using Jolet and udf and neither of them convert to lowercase when I create an iso file. I read on here that there is an option to deselect UPPERCASE folders but I'm not seeing it anywhere in img burn.
 -
If I have two DVD ISO files (i.e. 1/2 and 2/2) can I burn them to one dual layer DVD rather than burning two single layer DVDs?
-
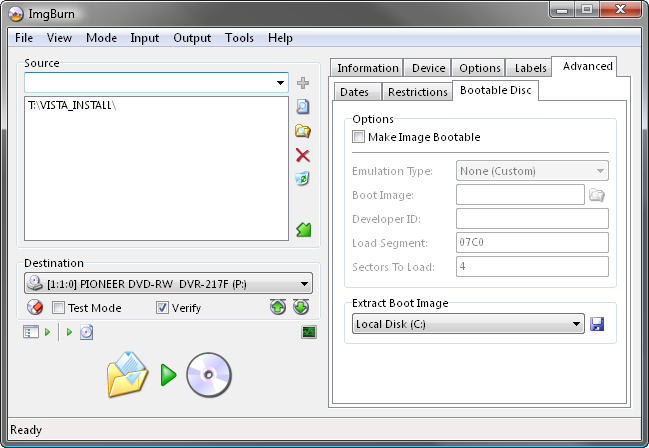
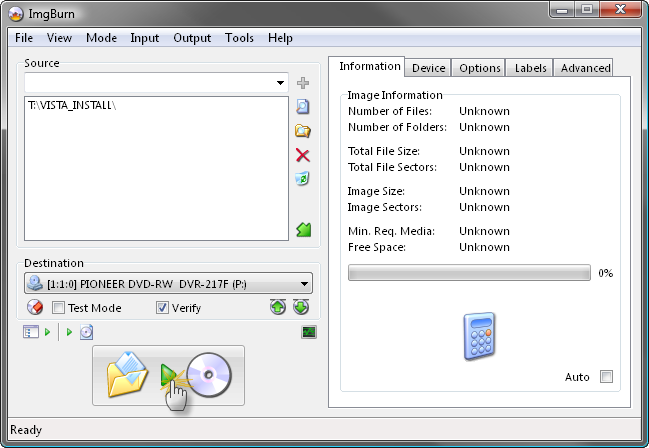
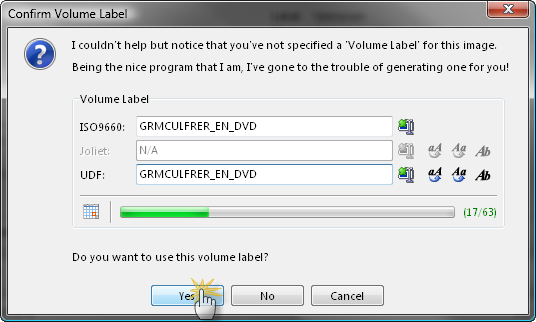
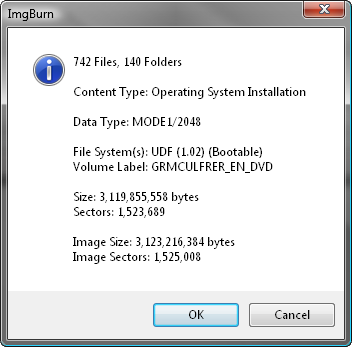
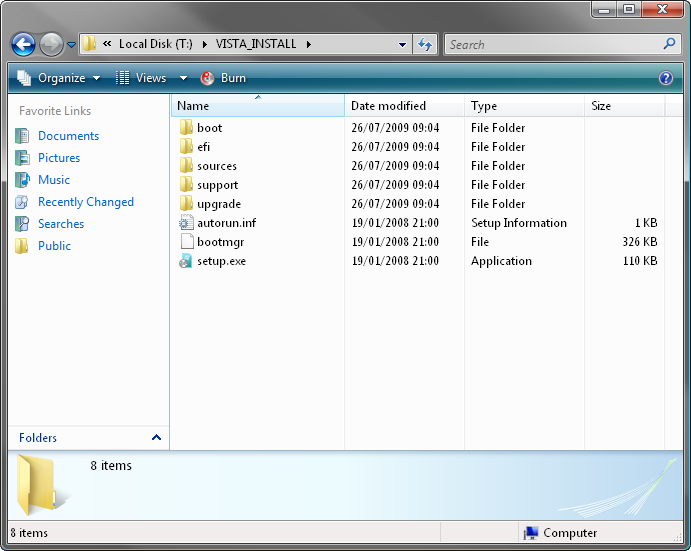
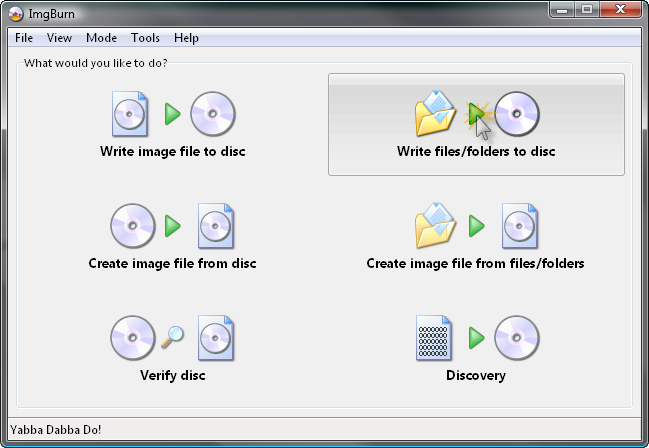
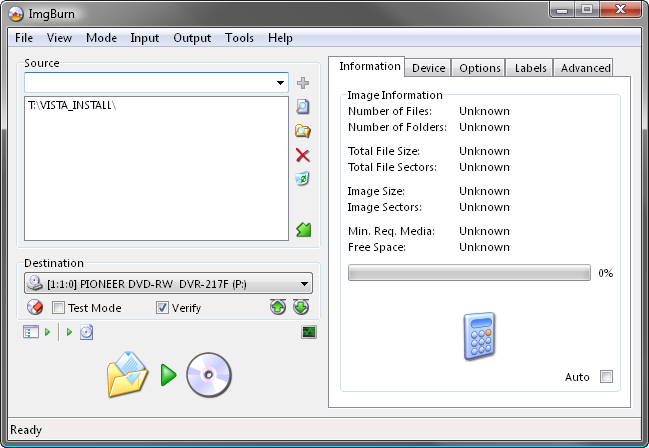
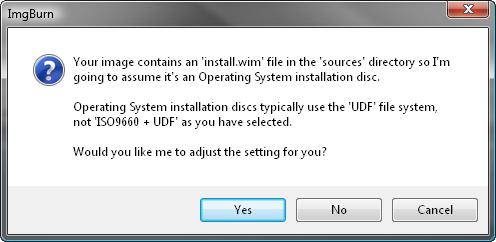
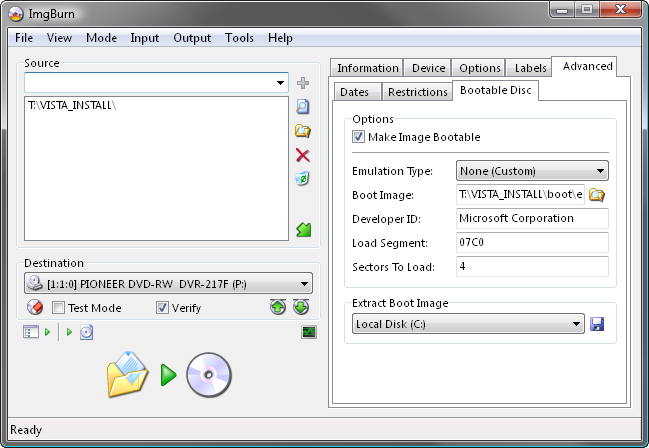
 This guide will take you through the steps in burning a pre-prepared Windows Vista / Windows 7 / Windows 8 installation source directory to a disc. Note: Instructions wise, Windows 2008 should be basically the same as Windows Vista, Windows 2008 R2 should be basically the same as Windows 7 and Windows 2012 should be basically the same as Windows 8. My source directory (which I've called 'VISTA_INSTALL') looks as follows: That's everything you'd get on an original Vista installation disc. If you're missing bits (e.g. the 'boot' folder), it probably won't work. Right, let's begin! 1. Load ImgBurn! 2. Click the 'Write files/folders to disc' button. Note: This is basically the same as switching the 'Mode' to 'Build' and setting 'Output' to 'Device'. You should now see a screen like this: 3. Insert a blank (or erasable) DVD disc in your burner. Note: The message in the status bar should now say something along the lines of 'Ready'. 4. Add the installation source folder to the 'Source' box. 5. Switch to the 'Advanced' tab, and then to the 'Bootable Disc' one. 6. Enable the 'Make Image Bootable' option. Set the 'Emulation Type' to 'None (Custom)'. Point the 'Boot Image' to the 'etfsboot.com' file within the 'boot' folder in your source folder - i.e. "T:\VISTA_INSTALL\boot\etfsboot.com" Set the 'Platform ID' to '80x86'. Enter 'Microsoft Corporation' in the 'Developer ID' field. Enter '07C0' in the 'Load Segment' field. Enter '4' in the 'Sectors To Load' field if your etfsboot.com file is 2K in size, enter '8' if it's 4K. (Basically it's the size of the file in bytes divided by 512 - i.e. 2048 / 512 = 4) Note: Vista's is normally 2KB and Windows 7 / 8's is 4KB... so enter '4' if you're building a Vista OS installation disc and '8' if you're building a Windows 7 / 8 OS installation disc. 7. Now we're ready to burn so click the big 'Build' button! 8. Assuming your source folder is in order (i.e. it contains a 'sources' folder with an 'install.wim' file in it) and depending on your current settings, the program will prompt to correct certain things so they match (as closely as possible) an official Microsoft disc/image. Click 'Yes' to whatever it says needs correcting - these settings have been tried and tested so we know they work! 9. When prompted, give the disc a name and click the 'Yes' button. 10. You'll then be presented with one final 'information' screen before the program starts to burn the disc. Double check everything looks roughly as it does below and then click 'OK'. That's it!


-
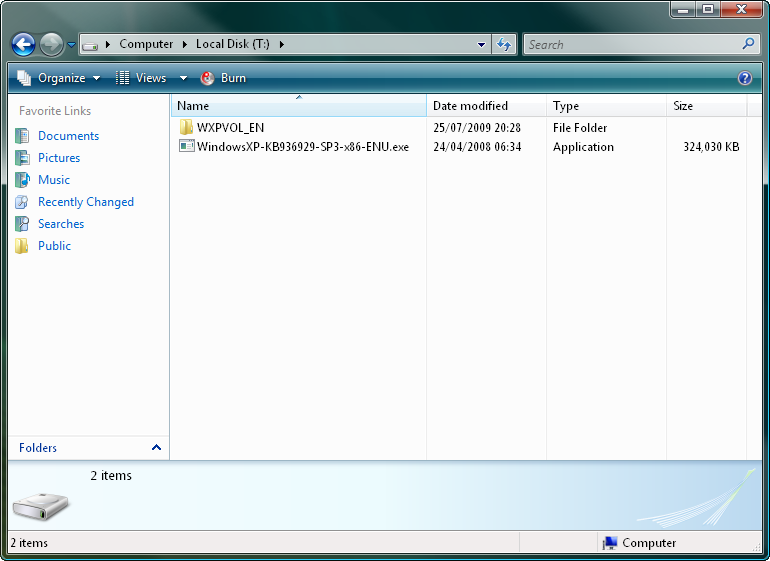
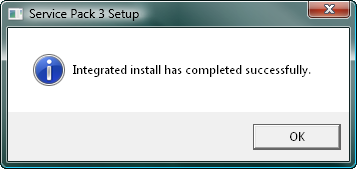
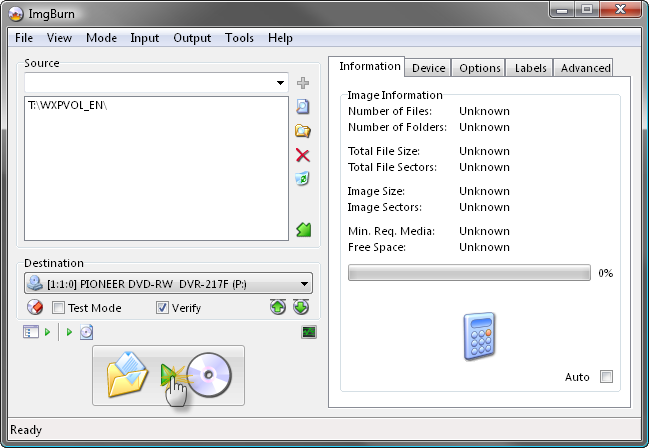
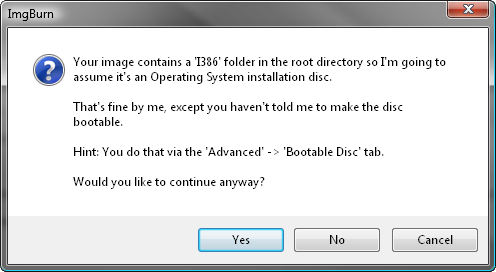
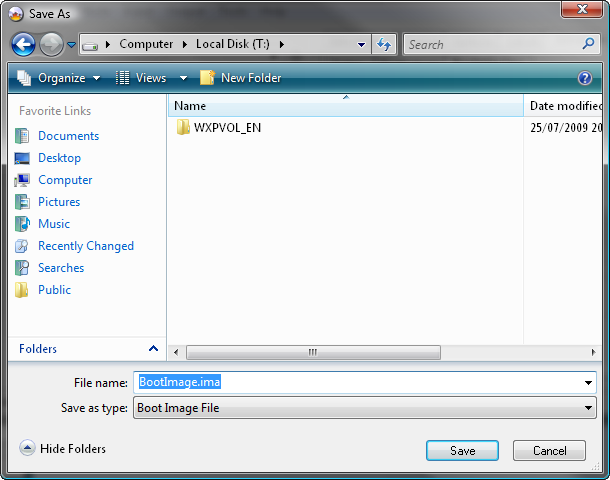
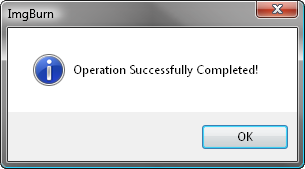
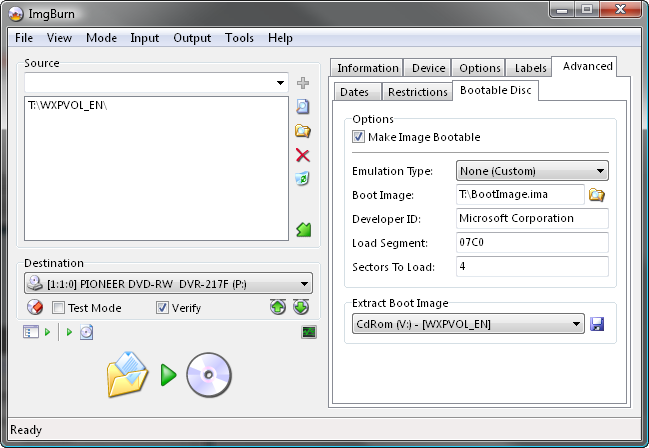
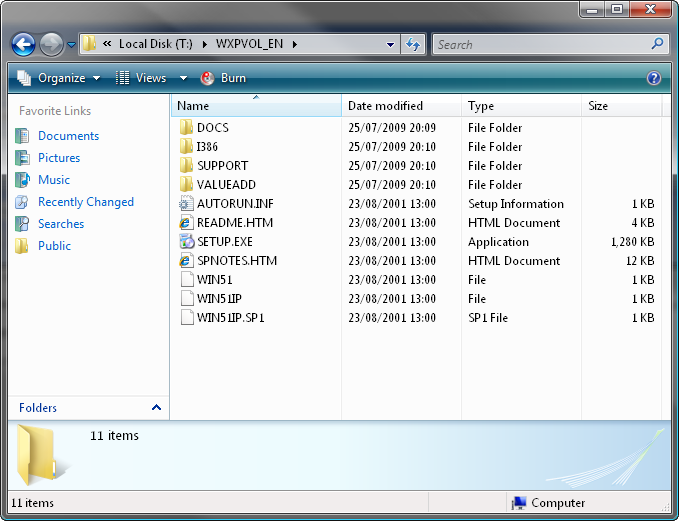
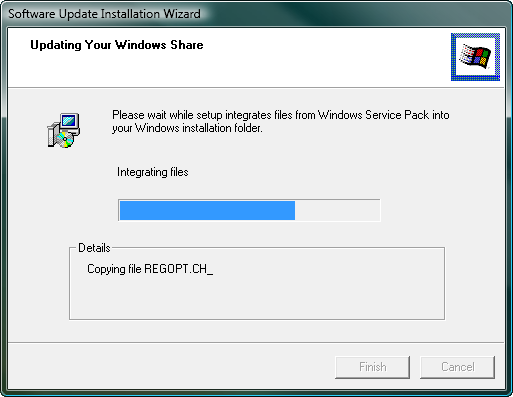
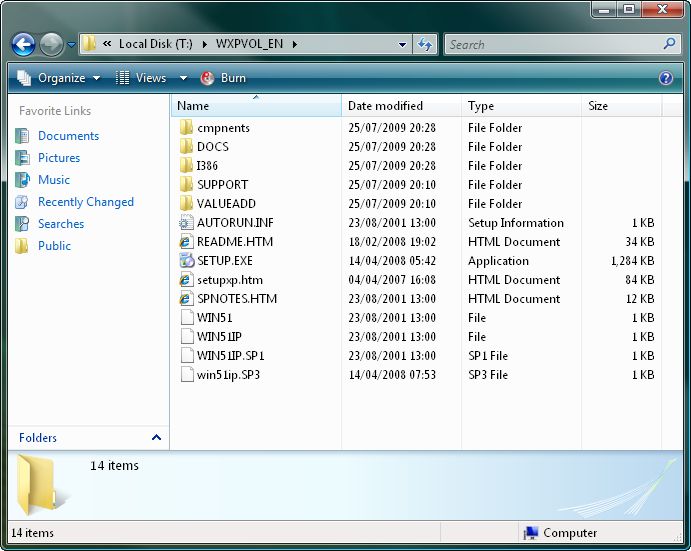
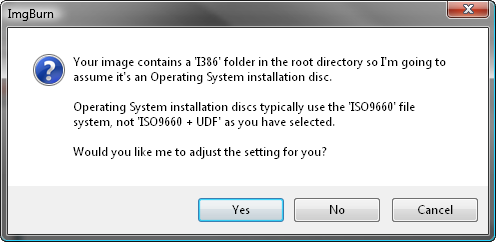
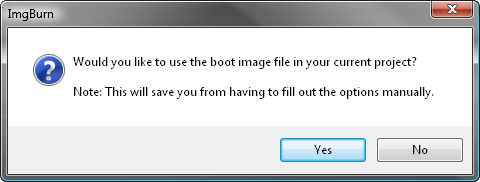
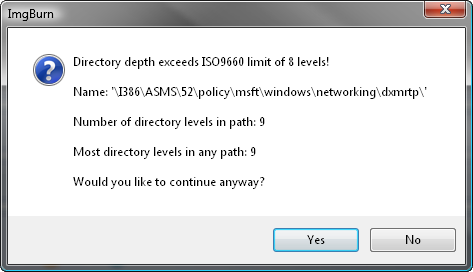
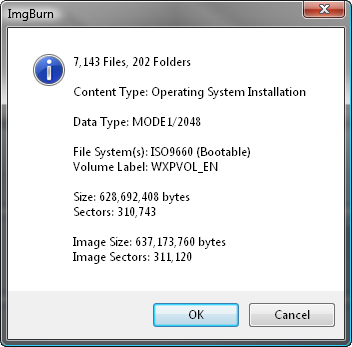
This guide will take you through the steps in slipstreaming the latest service pack into Windows XP and burning it to a disc. Slipstreaming... Please note: It has come to my attention that you can't use the '/integrate' switch to slipstream SP3 (into the volume licensing edition anyway) unless you're actually doing so within XP/2003 (i.e. it won't work if you're running Vista or newer) - Read Microsoft's KB article 950722 for more info. Start by creating a folder on your hard drive and copying the entire contents of your original XP disc to it (just drag+drop it all using Explorer). In this example, I'll use a folder called 'WXPVOL_EN'. Below you can see what my folder looks like initially: Now let's assume we want to integrate service pack 3 into it... Download SP3 from Microsoft's website. I ended up with a file called 'WindowsXP-KB936929-SP3-x86-ENU.exe'. Now bring up a command prompt window and run the following command - changing the target directory where appropriate. WindowsXP-KB936929-SP3-x86-ENU.exe /integrate:"T:\WXPVOL_EN" All being well, it'll then start to integrate itself into the folder. ...and once it's finished you should see this: That's it, we now have a nice set of source files for burning a Windows XP SP3 OS installation disc. Burning... Load ImgBurn! 2. Click the 'Write files/folders to disc' button. Note: This is basically the same as switching the 'Mode' to 'Build' and setting 'Output' to 'Device'. You should now see a screen like this: 3. Add the 'WXPVOL_EN' folder to the 'Source' box. 4. Switch to the 'Advanced' tab, and then to the 'Bootable Disc' one. If you have your original XP install disc, proceed with step 4.a. If you don't, proceed with step 4.b. 4.a. Select the drive with your original XP install disc in it and click the 'Extract Boot Image' button. Pick a destination folder and name for the file and then click the 'Save' button. Make sure you don't save it in the 'WXPVOL_EN' folder! Once ImgBurn has extracted and saved the boot image you should see this: Click 'OK' and you should then see this one: Click 'Yes' to save yourself some time! You should then notice the fields at the top of the 'Bootable Disc' tab have been filled out. Now proceed with step 5. 4.b. Using the boot image attached below, extract the zip archive to your hard drive. The parent folder of the 'WXPVOL_EN' folder would be an ideal location (i.e. in this example, T:\). Make sure you don't extract it to the 'WXPVOL_EN' folder! BootImage.zip Now enable the 'Make Image Bootable' option and configure the settings as shown below - using the correct path for the 'Boot Image' of course - only you know where you extracted it to! 5. Insert a blank (or erasable) CD/DVD disc in your burner. Note: The message in the status bar should now say something along the lines of 'Ready'. 6. Now we're ready to burn so click the big 'Build' button! Assuming your source folder is in order (i.e. it contains an I386 folder) and depending on your current settings, the program will prompt to correct certain things so they match (as closely as possible) an official Microsoft disc/image. Click 'Yes' to whatever it says needs correcting - these settings have been tried and tested so we know they work! Note: If you haven't completed the 'Bootable Disc' tab properly, you'll get the prompt below. Do NOT click 'Yes' to that one! Instead, click 'Cancel' and correct the problem as per step 5 above. Once everything has been checked and tweaked (and assuming you haven't already filled it out on the 'Labels' tab) you should be prompted to enter/confirm a volume label for the disc. I'm happy to accept the default value here - which has been generated from the name of the folder we added to the 'Source' box earlier. If you then get a prompt about directory levels, just click 'Yes' to continue anyway. You'll then be presented with one final 'information' screen before the program starts to burn the disc. Double check everything looks roughly as it does below and then click 'OK'. That's it!


-
 H. I've downloaded the TS file from internet and the file size is 6.38GB in total. I used Build image function to create ISO file. The ISO file is also 6.38GB. My concern is whether ImgBurn can create/write on 2-single layer DVD rather than create/burn on 1 double layer DVD. Your responce is much appreciated. Thank you
 -
 ARRRRGHH! Okay, I feel better now. The really frustrating thing is, I did this about a year ago, using Imgburn! Now? I'm making one coaster after another! Okay, here's where I am. I have a legitimate OEM Win2K install disk, bought when I built a computer a few years ago. Okay, quite a few years ago. Last year I created a slipstreamed (SP5) install disk. I set it up for unattended installation with the instruction file on a floppy, which allows me to put the Documents & Settings where it belongs, on the D drive. This disk works fine so apparently I had this figured out at one time! NOW, I want to use the same slipstreamed build, only with the installation instructions (winsf.sif) on the CD, not on a floppy. This is so I can reinstall it on my laptop, which doesn't have a floppy. (It has a Win2K OEM COA, so no problem with licensing.) That part is easy - I have the file built and in the i386 folder, so it should be good to go. However, I keep getting non-bootable CDs! When I try to boot, I get "Cannot boot from CD: Code 5" I can read these CDs in working computer, and ImgBurn reports it as bootable, but it don't work! I know I"m missing some step, or setting something wrong. I have read the guides, the FAQs and searched the threads for answers, tried this and that and the other thing, and still can't get it right. Can someone take pity on my ignorance and tell me step by step how to do this? I have the slipstreamed build - I just need to get from there to a bootable disk. Oh, yeh: LOG! I 18:12:43 ImgBurn Version 2.4.1.0 started! I 18:12:43 Microsoft Windows 2000 Professional (5.0, Build 2195 : Service Pack 4) I 18:12:43 Total Physical Memory: 261,600 KB - Available: 39,116 KB I 18:12:43 Initialising SPTI... I 18:12:43 Searching for SCSI / ATAPI devices... I 18:12:44 Found 1 DVD
 -
I 09:36:42 Searching for SCSI / ATAPI devices... E 09:36:45 CreateFile Failed! - Device: '\\.\CdRom0' (D:) E 09:36:45 Reason: The maximum number of secrets that may be stored in a single system has been exceeded. E 09:36:47 CreateFile Failed! - Device: '\\.\CdRom1' (E:) E 09:36:47 Reason: The maximum number of secrets that may be stored in a single system has been exceeded. E 09:36:51 CreateFile Failed! - Device: '\\.\CdRom5' (F:) E 09:36:51 Reason: The maximum number of secrets that may be stored in a single system has been exceeded. W 09:36:51 Errors were encountered when trying to access 3 drives. W 09:36:51 These drives will not be visible in the program. W 09:36:51 No devices detected! plz help
-
Regardless of source CD, I select Read. The Destination defaults to a BIN file extension. I select Browse, change the Save as Type to ISO. Process begins and ends, but at conclusion I end up with an IMG, CCD, and Cue files. I've tried with different CDs. All are regular under 650mb cds, no funky copy protection, etc, they are not games Cds or copy protected CDs to my knowledge. Imgburn says they are ISO9660. I am able to use Roxio Creater to create ISO, and on my Mac Toast Titanium is able to make ISO's. I was looking to use your program as a smaller, leaner substitute when I don't need anything fancy like Toast or Roxio. Here is my log: I 21:47:39 ImgBurn Version 2.4.4.0 started! I 21:47:39 Microsoft Windows Vista Ultimate Edition (6.0, Build 6002 : Service Pack 2) I 21:47:39 Total Physical Memory: 3,667,216 KB - Available: 2,824,852 KB I 21:47:39 Initialising SPTI... I 21:47:39 Searching for SCSI / ATAPI devices... I 21:47:40 Found 1 DVD
-
Hi There! First of all: Thanks for that great application! Now let me explain what i mean with "File based Skipping" and why i think this might be usefull. Im primary using ImgBurn to create iso files from the discs i own, in oder to save them to HD. Most of the disc i create images of are BluRays. In the past few weeks however more and more BluRays i tried to image seem to use some kind of "bad sector" or "fake files" or whatever that might be called protection. They have files stored on them with the associated sectors being unreadable. AFAIK these files are just dummys and not needed for anythong except annoying me ;-) Now when i trie to create an image, everything is OK until ImgBurn reaches sectors associated with such a File. The biggers these fake files are, there more time it takes to pass past these files. For me it takes about 5 seconds per bad sector to skip - so an 1GB files would take years to skip ;-) As ImgBurn tells me the affected Filename, it should be possible to implement an option which results in skipping all the sectors associated with that file. If this should be impossible - an option to manually select files from the disc an mark them as skippable would also be nice (since i know the filenames affected). I would be very lucky to find this feature in a future release of ImgBurn! Thanks in advance and best regards elpeterle
-
Hi, I have to make an ISO-file from many DVD's Is there a way to do that in the batch ? I checked an earlier post about batchprocessing folder -> ISO, but what I'm looking for is something like: open tray close tray create iso open tray and so on. Is it possible to do ? Thanks for any suggestions. Ralf
-
Hi people. I want to create a bootble CD, and I also need to place one small TXT file on it after its created. I did only %50 of this. I burned a bootable CD. But I can't add anything to it. It says something about "Write-Protected". How do I fix this? But still make CD/DVD bootble. Thank You Guys!!
-
A lot of times, when I try to make .iso-files with ImgBurn, I get this same result. I only have managed to do one .iso properly. Failed to Read Sector 831 - Reason: Unknown (CRC or ECC Error) (ASC: 0x10, ASCQ: 0x90)
-
I'm trying to create a bootable dvd+dl disc. I currently have a set of two dvds that I use for ghosting computers and I would like to combine them into a single dual layer disc to save on the number of discs that I need to carry around. I've read in some other posts that the files may need to be written in a certain order to allow booting and I'm looking for some guidance on how to do that. Thanks
-
how do i build a xp boot disk?
-
Hello, I am planning to tryout some DVD-R Double Layer DVDs with imgburn! First off, can imgburn create such DVDs? The reason I ask is that previously with NTI, nero 8, and imgburn I have tried to create DVD+R DL DVDs, and only ONE suceeded! They all have troubles going from layer 1 to layer 2! Actually, nero seems to produce better results than imgburn: with nero I have to manually force the player to move to layer 2, whereas imgburn goes auomatically to layer 2 but the image freezes, then anothe image appears frozen and this is repeated 3 or 4 times, followed by a return to the menu! Sorry, no log files were yet created! _R
-
Probably Total Mounter. There is also Daemon Tools paid versions, but it looks terribly complicated and has a pile of 'features' I don't want as well the ones I already use in ImgBurn. All I'm wanting to do is create .bin files straight from Sound Forge so I can keep a burnable backup of product I make CD masters of in SF. I'm somewhat surprised it's not possible to render out to/ save as an image file simply because it is a nice all-in-one file instead of the pile of data that SF makes. Currently I burn a disc and then make a .bin in ImgBurn, but I'm concerned that there may be dropouts when scanning an optical disc (dust, etc.). Apologies to OP for hijacking the topic.
-
hi guys. i would like your help about a problem i have. first of all,i find imgburn's function to autoqueue and autoburn iso files,fantastic.its a real time saver and moreover it helps me to organize my burned dvds better. what i miss,and i dont know if some other program can handle it,is the ability to autocreate iso files from specific folders with a very ittle involvement from my part. i ll explain what i mean. i have one main folder,with subfolders named data1,data2,data3 etc.all the subfolders have data whose size doesnt exceed the capacity of a dvd disk.in other words,the subfolders are ready to get burned,which i always do using the build mode of imgburn. now i wonder if there is a program,which can automaticaly get each subfolder and create an iso of it with the label of the subfolder. for example i run the program,i insert the subfolders,it takes the first subfolder data1,it creates an iso file with the name data1,then it takes the subfolder data2,it creates an iso file with the name data2,and so on. i know that ultraiso,folder2iso,mkisofs,etc create iso files from folders.i want something similar with the ability to batch-create iso files from folders. please if u can help me with this,u will make burning a lot easier for me.because for now what i do,is to run the buld mode from imgburn,add the data1 folder,burn the disk,then remove the data1 folder,add the data2 folder,make a new burn,and so on. if i can combine the iso autoqueue function of the imgburn with the iso autocreate function of some other program,i would be a very very happy man. pls help.
-
 >> How to cancel automatic of create Project's_Name.ibg when i build DVD ??