Search the Community
Showing results for 'create bootable grub2 image'.
-
IB creates ISO's in build mode ,have you bothered to read the cd to your hard drive ? doesn't look like it ,IB does not uncompress anything its not one of its functions ,for a look I read my sound blaster software CD to my HD and it was an ISO ,try to read it and see what happens "So, if I understand correctly, ImgBurn can read only uncompressed files." False IB reads compressed stuff I make copies of compressed dvd's without any problems, do you think it would be any different because its a CD, will you read the disc to your HD already please and post the log when you do I inserted CD into CDRom, selected "Read" Mode in ImgBurn, selected output file destination, then click 'Read' button. After program finished, I got 83MB WinRAR archive on my harddrive. I this what need be done to create ISO? There is also 'Build' Mode that do the same thing, and I can select D:\ drive in 'Source' window. Finally got 69.6MB RAR archive + some .mds file. The difference is that is right pane appears 4 tabs Inform, Options, Labels, Advanced with various settings, which purpose is not very clear. So what from this RAR archive can be considered as correct "ISO"? (if it can create correct ISO at all).
-
So, if I understand correctly, ImgBurn can read only uncompressed files. So, how to create ISO image from CD? Unfortunately, program contains no help file, even simple. However, probably ImgBurn just not intended to be used for creation of an ISO image, as I know, most users use Magic ISO or UltraISO for this task. Is there better programs that can do this task correctly?
-
From ISO the layerbreak will not be present. To recalculate use the tools / ISO /display IFO then browse for the IFO You can recreate the MDS file from tools menu then browse for ISO, I'm sure it will not insert layerbreak though. (at create mds file bit if you manually enter the layerbreak that you got from IFO) it will then patch this into .mds If you already know the layerbreak (eg xbox360 game) you could create it in text doc then save as .dvd LayerBreak=1913760 GRAW2.iso I think, so wait for the author of program or blutach to respond.
-
Have read, no clear. Its not for backuping DVD Video discs. I need build ISO from data CDs, to create software backup. 1) what from this 3 file system should be used? ISO9660 ISO9660 + Joliet ISO9660 + Joliet + UDF 2) "From the Labels tab you can give your iso the name you want it to have." Not clear. We already set ISO name in previous step? (when choose Destination - ISO name) 3) "Restrictions" - what should be set - ISO9660: Level 1, Level2, Level X? Allow More.. Allow More.. Allow Full.. Dont Add.. Joliet Level 1 Level X 4) "Make Image Bootable can be checked if you want to make a bootable image" -is this necessary when we build ISO from software media CD?(bootable itself)
-
why would you want the files, if your so desperate for files video_ etc then create ISO then extract it.( you need winrar) read ISO in ImgBurn is for non protected material, protected material you need something else. ImgBurn works as it was intended.
-
Since you're already on the subject, would it be possible to add a "Verify Against Virtual Image" check box in "Verify Mode"? That way we could "build" the image to verify the data on discs burned in "Build Mode" without first creating an .iso file to hard disk. I often use Imgburn to create data discs and currently I see no other way. (Please correct me If i'm wrong.)
-
How are you making the nrg's in the first place? If the values aren't right in the filesystem, they'll be wrong in the program when I tried to read them. If you tell me the exact steps used to create the ISO (and all the options), I'll do the same thing here. If I build an ISO with ImgBurn and burn it to DVD+RW, when I read it back, it shows me the right size. Building the image (on-the-fly)... I 19:43:36 Operation Started! I 19:43:36 Source File: -==/\/[BUILD IMAGE]\/\==- I 19:43:36 Source File Sectors: 608 (MODE1/2048) I 19:43:36 Source File Size: 1,245,184 bytes I 19:43:36 Source File Volume Identifier: CD I 19:43:36 Source File Application Identifier: IMGBURN V2.3.0.0 - THE ULTIMATE IMAGE BURNER! I 19:43:36 Source File Implementation Identifier: ImgBurn I 19:43:36 Source File File System(s): ISO9660, UDF (1.02) I 19:43:36 Destination Device: [0:0:0] PLEXTOR DVDR PX-760A 1.06 (G:) (ATA) I 19:43:36 Destination Media Type: DVD+RW (Disc ID: MKM-A03-00) (Speeds: 6x, 8x) I 19:43:36 Destination Media Sectors: 4,294,770,688 I 19:43:36 Write Mode: DVD I 19:43:36 Write Type: DAO I 19:43:36 Write Speed: MAX I 19:43:36 Link Size: Auto I 19:43:36 Test Mode: No I 19:43:36 BURN-Proof: Enabled I 19:43:36 Filling Buffer... (40 MB) I 19:43:37 Writing LeadIn... I 19:43:52 Writing Image... (LBA: 0 - 607) I 19:43:52 Synchronising Cache... I 19:43:53 Closing Session... I 19:43:54 Image MD5: c59523df7e3884cb8c55678e84148528 I 19:43:54 Exporting Graph Data... I 19:43:54 Graph Data File: C:\IBG\PLEXTOR_DVDR_PX-760A_1.06_10-MARCH-2007_19-43_MKM-A03-00_MAX.ibg I 19:43:54 Export Successfully Completed! I 19:43:54 Operation Successfully Completed! - Duration: 00:00:18 I 19:43:54 Average Write Rate: N/A - Maximum Write Rate: N/A I 19:43:54 Cycling Tray before Verify... I 19:44:17 Device Ready! I 19:44:17 Operation Started! I 19:44:17 Source Device: [0:0:0] PLEXTOR DVDR PX-760A 1.06 (G:) (ATA) I 19:44:17 Source Media Type: DVD+RW (Book Type: DVD+RW) (Disc ID: MKM-A03-00) (Speeds: 6x, 8x) I 19:44:17 Image File: -==/\/[BUILD IMAGE]\/\==- I 19:44:17 Image File Sectors: 608 (MODE1/2048) I 19:44:17 Image File Size: 1,245,184 bytes I 19:44:17 Image File Volume Identifier: CD I 19:44:17 Image File Application Identifier: IMGBURN V2.3.0.0 - THE ULTIMATE IMAGE BURNER! I 19:44:17 Image File Implementation Identifier: ImgBurn I 19:44:17 Image File File System(s): ISO9660, UDF (1.02) I 19:44:17 Verifying Sectors... (LBA: 0 - 607) I 19:44:21 Device MD5: c59523df7e3884cb8c55678e84148528 I 19:44:21 Image MD5: c59523df7e3884cb8c55678e84148528 I 19:44:21 Exporting Graph Data... I 19:44:21 Graph Data File: C:\IBG\PLEXTOR_DVDR_PX-760A_1.06_10-MARCH-2007_19-43_MKM-A03-00_MAX.ibg I 19:44:21 Export Successfully Completed! I 19:44:21 Operation Successfully Completed! - Duration: 00:00:03 I 19:44:21 Average Verify Rate: 405 KB/s (0.3x) - Maximum Verify Rate: 405 KB/s (0.3x) What 'Read' mode says about that disc once burnt... PLEXTOR DVDR PX-760A 1.06 (ATA) Current Profile: DVD+RW Disc Information: Status: Complete Erasable: Yes Formatted: Yes Sessions: 1 Sectors: 2,295,104 Size: 4,700,372,992 bytes Time: 510:03:29 (MM:SS:FF) File System Information: Sectors: 608 Size: 1,245,184 bytes Time: 00:10:08 (MM:SS:FF) Physical Format Information (ADIP): Disc ID: MKM-A03-00 Book Type: DVD+RW Part Version: 3 Disc Size: 120mm Maximum Read Rate: Not Specified Number of Layers: 1 Track Path: Parallel Track Path (PTP) Linear Density: 0.267 um/bit Track Density: 0.74 um/track First Physical Sector of Data Area: 196,608 Last Physical Sector of Data Area: 2,491,711 Last Physical Sector in Layer 0: 0 Physical Format Information (Last Recorded): Disc ID: MKM-A03-00 Book Type: DVD+RW Part Version: 3 Disc Size: 120mm Maximum Read Rate: Not Specified Number of Layers: 1 Track Path: Parallel Track Path (PTP) Linear Density: 0.267 um/bit Track Density: 0.74 um/track First Physical Sector of Data Area: 196,608 Last Physical Sector of Data Area: 0 Last Physical Sector in Layer 0: 0 As you can see, that comes out perfect. I'll keep trying different things to see if I can find where the problem is coming from
-
The exact error I'm getting is saying: Unable to create or replace file, Reason: Access is denied! I thought it might be the movie I'm trying to copy but I tried about 15 of them and am getting the same error everytime.
-
get dvd shrink /re author , drag 1,2 3 to left create ISO then burn. really though the disc's you have done already are fine so you have not wasted them, you just got the titles on there twice ..double the viewing pleasure
-
Thx for the quick reply Ok understood - but are there any quality differences when ignoring the specs (as Nero or when pressing Yes in ImgBurn) and will there be any playback problems etc as opposed to rebuilding the image with ImgBurn? Also, should I tick the "Seamless & Don't Update IFO/BUP Files" in the options field within the "Create layer Break Position" dialog screen? What do these options do?
-
Hi, Yesterday I was playing with a new version of ImgBurn, and found that when I create a DVD Video disc/image, the program modifies .IFO and .BUF files of the original VIDEO_TS folder. Could someone please explain the reason for this and is there a way (maybe some setting in the menu) to prevent this behaviour. The DVD image I was creating had only one layer, so I assume 'layer break' has nothing to do with this. I was comparing files in the original VIDEO_TS folder and that in the DVD image mounted as a virtual drive using some binary comparison software. Currently I use Roxio Easy Media Creator 9 for burning (the main program of the suite called 'Home' which is essentially RecordNow). And the two main reasons I prefer it to Nero and others are: 1) It supports unicode files and folders for data discs. (it doesn't support it in other parts of the same program though) 2) It does not modify files when burning VIDEO_TS folders. Not a single byte. Even when burning dual layer discs. And yet discs play perfectly in DVD players. To me, modification of files by burning program does not look good at all. It is basically re-authoring. Also, I cannot use a burned disc as a backup of original VIDEO_TS folder and thus delete the original. It is not even clear how to back it up using such programs at all. But definetely we need some alternative to both Nero and Roxio. They bundle their burning programs with all kinds of crap possible and their installation software will soon exceed 1GB of size. So this small and nice program ImgBurn looks as a promising alternative. I was very happy to see that the latest version supports unicode. If not this issue with VIDEO_TS folders, I would probably start using it. Also, ImgBurn has so many options in the menu, and it doesn't even has a help file which explains them. Not even tooltips. It would be nice to fix this too. Regards, Stas
-

Burning more than one "dvd" to a dvd....
Shamus_McFartfinger replied to DaveElson's topic in ImgBurn Support
What you're talking about is taking multiple image files and burning them all to a single disk that's playable, yeah? ImgBurn can't do this. Nor can anything else. What you need to do is re-author every file within every image so the IFO files you create with your authoring package are pointing to the correct place. It's a huge job and outside the scope of this software. BTW, WinRAR has associated itself with your ISO files. That's why they look like *ZIP files. Open WinRAR, select the OPTIONS menu and then SETTINGS. Next, click on the INTEGRATION tab and un-tick ISO then hit OK. Fixed. -
Good question. There's an advantage to burning directly to disk. There's also an advantage to creating an ISO first. Straight to disk is usually going to be quicker for single copies. For multiple copies, creating an ISO first saves time. Also, any ISOs you create can be added to the "queue". If you have a few disks to do then it's alot simpler to build your ISOs first and then add them to the queue than having to build one then burn one then build one then burn one then build one.....
-
Hey all I?ve got this prolem, really innoying cause I?ve done this before, but now I just cant seem to remember how I did it. Trying to create single layer iso from a video_ts file, and i can get up to the point wher I?m supposed to say where I want to save the iso file after its been converted. But the problem is that I cant save it anywhere, the program doesn?t seem to find anywhere to save the file... I?ve managed this before as I said, but cant remember how. Hope I?ve explained this so you understand anyways, I?ll post a screenshot from the guides aswell so you can see the problem area. I cant choose a destination to save-
-

Humble requests that would allow me to toss almost every other burning app.
nwl replied to MLS's topic in ImgBurn Suggestions
I haven't done it recently, so I'm not sure about the current version of ImgBurn, but a few versions ago (1.x), you could burn multi-track .BINs with it. So, unless any of the applicable code has changed, you still should be able to do it. In the Tools menu, select Create DVD MDS File. (I personally think this should be changed to Create MDS File, since the format's not only for DVDs, but then I'm not the programmer.) Drag the .BIN file into the box and click on Quick OK. You will then have an .MDS file to load into ImgBurn to burn your multi-track CD. It's a little more complex, but think of an .MDS file as an updated form of a .CUE file plus a .DVD file with a few extras added. -
The mastering company is probably using Eclipse software to verify and create the glass master. Unfortunately, a ddp image is about the only thing you can give eclipse. Wheather it comes from tape, or a file set, it is all just ddp. Many replication plants will take DVD-+R media for masters. They will often inform you that you can't use RCE or CSS since recordable media doesn't allow for it. Many small replicators will take almost anything for a master. They are always trying to gain new clients and are very flexible. You should call around and see if you can get a better deal at another facility. If you really need to create and send a ddp, you can try Gear Pro Mastering Edition. Maybe a trial version or something is available. I know there is a create ddp function. Also DVD Studio Pro on the Mac has a ddp file output option, but I'm not sure if you need to create the project in DVDSP for this to work. Sonic has "Sonic Rom Formatter" but it is expesive so unless you know someone with a copy, it's probably out of reach. NC
-
Yeah I second that...why does it go down so much? Happy Birthday Volvo...never owned one, but I've been overtaken by loads. I think it said on the board you were 99, so well done for that. Hope I'm still posting at that age. Telegram from the Queen next time Something to think about... March 2007 PISCES (Feb 20 - Mar 20) Your March Forecast: When astrologers talk about Pisces, they become like painters trying to create a colourful picture with only one pot of purple paint. They twitter on about the 'dreamy', 'poetic' 'idealistic' nature of your sign. On the rare occasion they remember to credit you with common sense, they grudgingly describe it as 'intuitive'. They imply that your wisest choices are made more by luck than judgement. They forget that Einstein was a Piscean. He may well have had a creative side to his personality but he was a powerful, rational thinker too. Neptune and Saturn, this month, suggest you've got a tough choice to make. And you're about to get it brilliantly right.
-
Here's a quick rundown of the issue I'm having: I have an avi file i'd like to burn to DVD, so I use winAVI to convert it into the proper DVD format. When I'm done, I'm left with a folder that has the necessary audio_ts and video_ts folders. However, I have issues burning dvd's with winAvi (burning always freezes at exactly 10%) so I decided to use IMG burn because i've had great success with general image burning with it. So, I then create an ISO file from the dvd output mentioned before from winAvi. When it's done, I have an ISO file ready to burn. I burn the Dvd, put it in my dvd player.... and then the strangest thing happens... it starts playing, but in black and white, slightly scrambled, and rolling from top to bottom of the screen. Things I've tried: Re-Burning the image file to dvd Double checking the original avi file Checking the video outputs from winAvi It all checked out, so something is happening while the ISO is being created, or when the ISO is burned to DVD. Never had issues with the iso burning before, but this is the first time trying this with an AVI file. Not sure what to do. Any help or suggestions??? I"m totally stuck on this one!! PS I've tried the disc on another DVD player (got error message 'doesn't appear to be the correct tv system' on PS2)
-
You could also make a .dvd file (plain text file with .dvd file extension) containing the text: layer0.dat layer1.dat or use the 'create dvd mds file' feature, add the two files and make a .mds file. Then load the .mds file in Write mode. Then imgburn will treat the 2 files as a single large file.
-
If any of this info is off limits, moderators please edit or remove. The DLT tape itself will most likely not be CSS encrypted. The encryption process generally happens at the replication plant when they create the glass master. The keys are added at this point. Since they are so expensive, almost no DVD authoring facilities can afford to purchase the keys. If the intent was for this DVD to be CSS encrypted, the sector size written to the DLT will be 2054 rather than 2048. The 6 extra bytes per sector are where the CSS keys are written. 2048 is currently the only allowable sector size for recordable DVD's. If you read back the DLT (using Gear, Eclipse, your favorite authoring software, or other) you will get three files. CONTROL.DAT, DDPID.DAT and MAIN.DAT (sometimes MAIN.IMG) The only one you need to be concerned with will be the largest MAIN.DAT. The other two you can throw away. Rename the file with an IMG suffix and open in ImgBurn. When you try to burn it will inform you that it has a 2054 sector size and it will just cut off the extra. Say OK and burn away. Some players may complain that the copy protect flag is on (Quicktime) but the info isn't copy protected. This is fixable, but not on this forum. If you are trying to restore a DVD-9 (you will have two DLT's) then you will need to combine the two files together. The simplest way to do this is using the dos "copy" command. "copy /b layer0.dat + layer1.dat fullimage.img" Layer0.dat is the first layer, layer1.dat is the second layer and fullimage.img is the complete image fill output. You need to use the /b command to do a binary copy append. You can use ImgBurn to find a layer break, or you can calculate the layer break by dividing the layer0 file size by 2054 or 2048 where applicable to get the number of sectors on the first layer. This method is only a problem if the intent of the author was for the final pressed disc to be written PTP and the size of layer 1 is larger than layer 0. I hope this helps. Good luck!
-

Auto select joliet/udf for cd/dvd burning?
ssjkakaroto replied to simonh's topic in ImgBurn Suggestions
UDF is an accepted format for both CDs and DVDs, so there's no reason for Joliet to be preferred over UDF. I, for one, only use UDF for both CDs and DVDs, unless I'm creating a disc to be read on *nix systems. My suggestion to you is to create two empty projects, one with Joliet/ISO9660 selected and another UDF selected and instead of opening Imgburn through the normal link, you open it using the projects. -
Hi, I have been trying to search the forum, but I have not found the answer to the following: If I create an ISO for a dual layer DVD (this will be data only, not video), Does the MDS file have layer break information in it? I figure it does, I would just like confirmation. Thanks, Z
-
 This should be pretty superfluous, since AFAIK a bin/cue-rip of a data cd and a ISO-rip are 1:1 identical. So you could do... 1. Read/Build to ISO 2. Rename to .bin 3. create a .cue file by hand (track mode 1 / sector mode 2048) or copy and paste from existing data cue file) Simply load the bin file directly instead of the cue sheet. While I don't see the point in using bin/cue for data CDs, I don't think it's a big deal to add it to ImgBurn, but then a bin file of a data cd and an ISO file are pretty much the same, so is it really worth the effort? On a sidenote: Does ImgBurn support track mode 2? Something similar to Exact Audio Copy's profile manager? Yes, sounds good. I agree! ImgBurn is the best.
 -
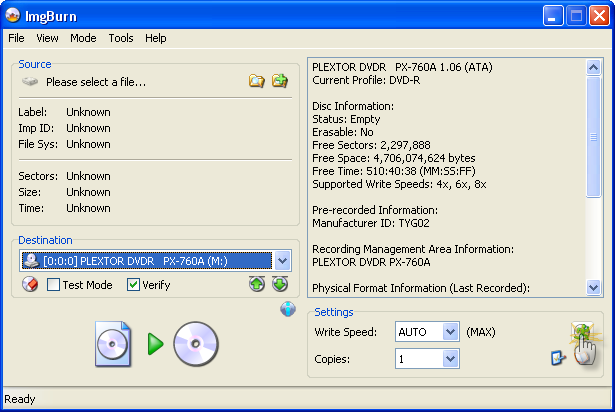
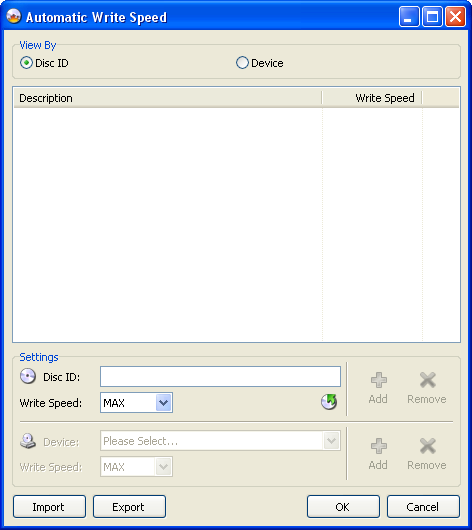
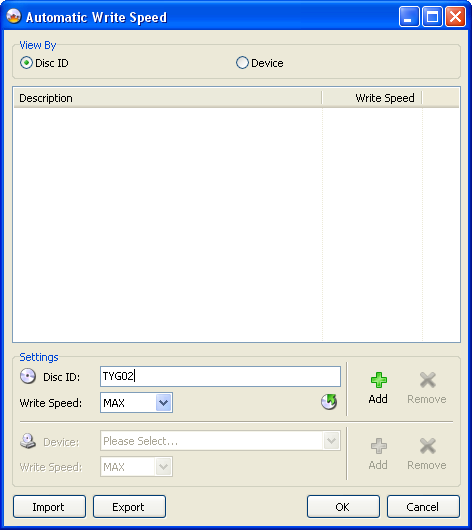
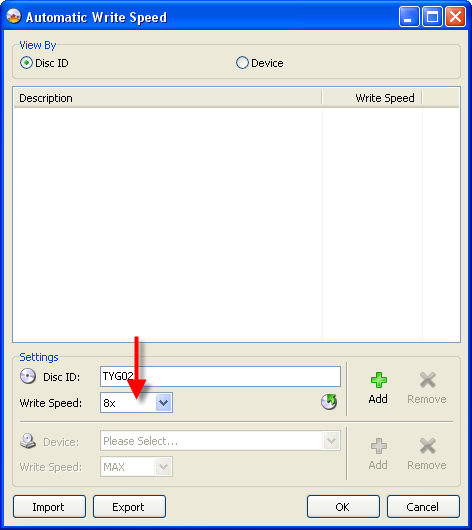
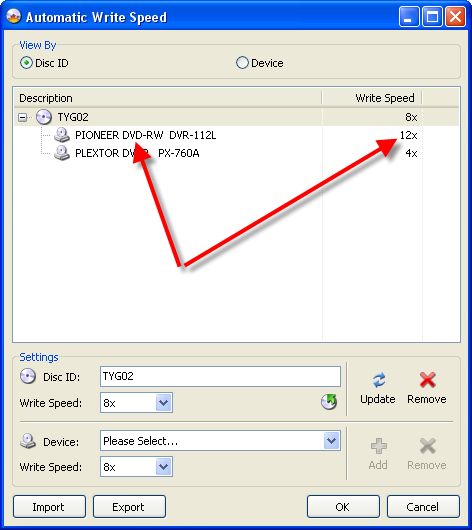
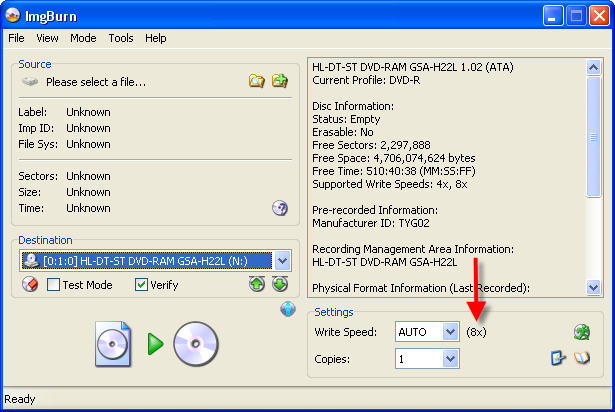
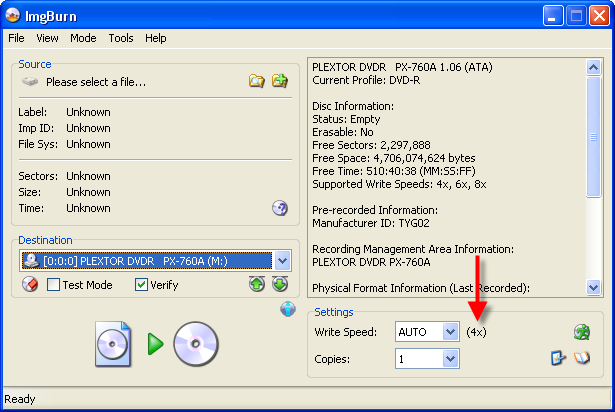
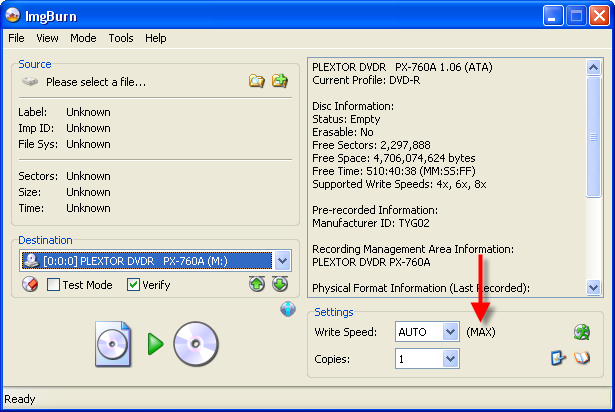
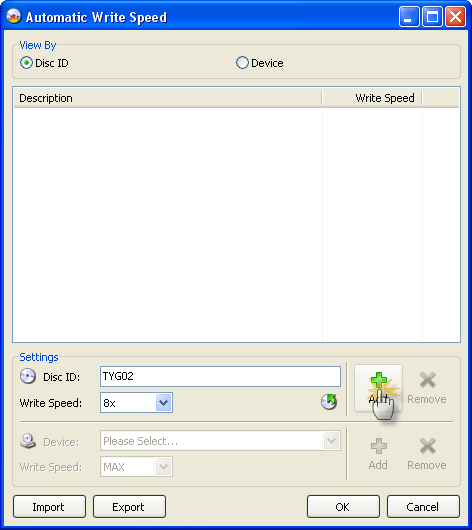
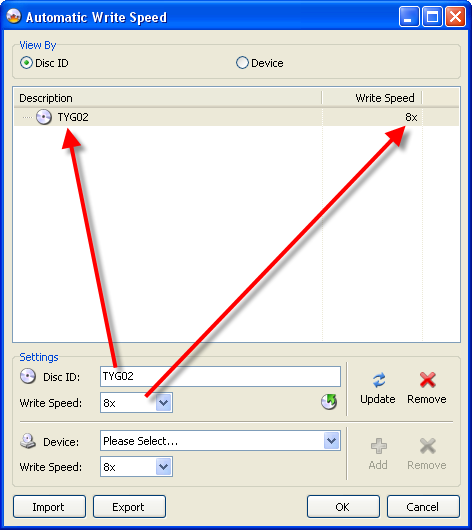
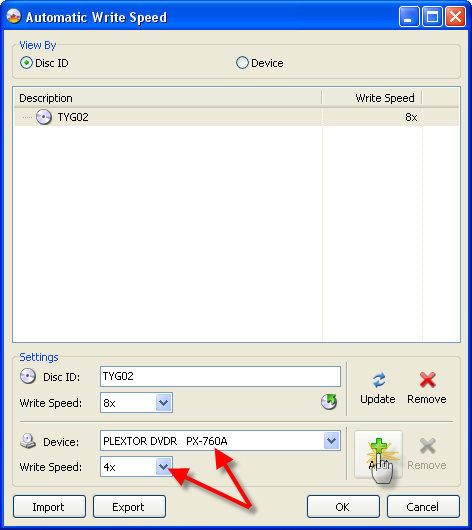
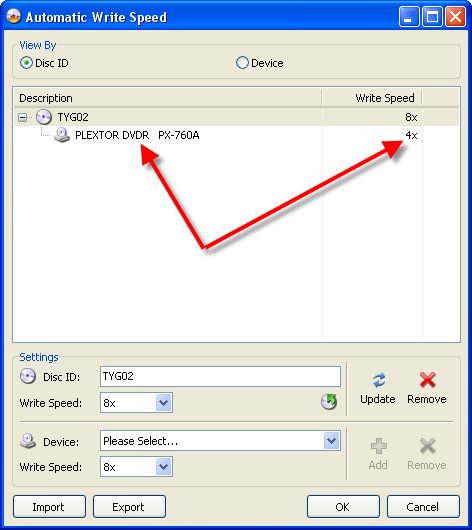
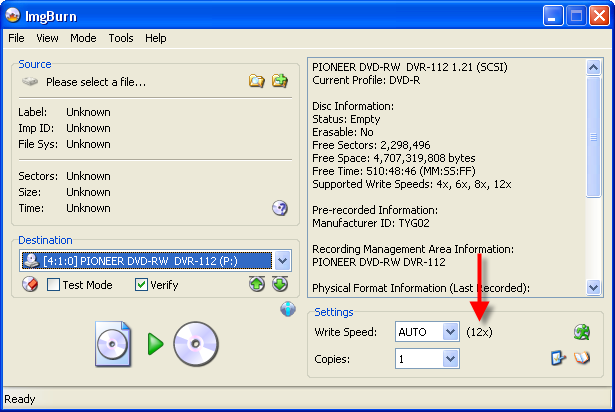
 Hello and welcome to another of my legendary guides *cough* In this one I'll be explaining how to use the new 'Automatic Write Speed' feature found in versions 2.2.0.0 onwards. For those of you that don't know, the 'Automatic Write Speed' feature basically lets you configure a set of predefined write speeds for any given type / brand of media and the program will automatically use those speeds every time you burn that type of disc, without you ever having to change anything. So when you switch between your good discs and your bad discs, or your single layer discs and your double layer discs, you don't have to worry about them burning at the wrong speed. Neat huh? =========================================================================== Right, so obviously the first thing we need to do is load ImgBurn. I'm going to assume you at least know how to do that! Once it's loaded, for the sake of keeping things simple, switch to 'Write' mode. You do that by clicking on the 'Mode' button in the menu at the top and then selecting 'Write', as shown in the picture below. When you've done that, your screen should hopefully look something like this: If you look at the red arrow in the picture above, you'll see it's pointing to the 'Write Speed' drop down box. Notice how the box currently has the word 'AWS' in it? Well, that means the 'Automatic Write Speed' feature is active and will be used whenever you burn a disc! If the box doesn't say 'AWS', it won't be! The picture below points out some text to the right of the 'Write Speed' drop down box. Whatever it says there is the actual write speed that's going to be used - based on your current drive selection and the media in it. If there's nothing specifically configured for either of those (or there's no disc in the drive), it'll just show '(MAX)' - meaning the disc will be burnt at maximum speed. Ok, so that covers how to turn the feature on and off ('AWS' = On, Anything else = Off), now lets actually look at how we configure everything... To start, click the little button as shown below. For those of you that can't work out what that picture is, it's a little green stick man running over a disc! Whoooosh! When you've done that, you should see a screen like the one below... Welcome to the 'Automatic Write Speed' configuration screen! Right, ok, the first thing you need to remember is that this feature sets the write speed based on the media you're burning to. If you didn't already know, every different brand / type of disc (well, DVDs anyway) has its own unique code. If you've ever looked around at any forum postings, you may have noticed the terms 'Manufacturer ID' (MID) and 'Disc ID' being used. These are the unique codes of the disc that allow us to tell who made then (or rather who made the dye used on them) and what speed they're designed for, be it 4x, 8x, 16x etc. Some of the 'better' discs are known to use the following MID's: 'MCC 02RG20' - Verbatim 8x DVD-R Media 'MCC 03RG20' - Verbatim 16x DVD-R Media 'MCC-003-00' - Verbatim 8x DVD+R Media 'MCC-004-00' - Verbatim 16x DVD+R Media 'TYG02' - Taiyo Yuden 8x DVD-R Media 'TYG03' - Taiyo Yuden 16 DVD-R Media 'YUDEN000-T02' - Taiyo Yuden 8x DVD+R Media 'YUDEN000-T03' - Taiyo Yuden 16x DVD+R Media For the purposes of this guide, I'm just going to create an entry for discs using the TYG02 dye (they're my favourite ). So I start by typing 'TYG02' into the 'Disc ID' field as shown below. (*Read the text below for an alternative method!) Please Note: If there's a disc in the drive, the 'Disc ID' field may have already been filled out when you first opened the AWS settings screen. This is because the program automatically populates it with the 'Disc ID' of the media currently in the drive. You can also click on the little button (as shown below) to manually achieve the same effect (i.e. Read the Disc ID from the current disc and copy it to that 'Disc ID' field). This can come in handy when creating several profiles in one go. Before I can move onto the next bit, you need to understand that the write speed used by the AWS feature depends on 2 things. 1. Is there a specific write speed setting (profile) for this media? 2. If number 1 is true, is there a specific write speed setting (profile) for this drive, based on this media? (This will become clearer in a minute!) The screen below shows me changing the 'default' write speed for the media to 8x. This value will be used if there isn't a (more) specific one configured for the drive. I'm using 8x because I know the 'TYG02' dye is just about the best you can get and that I will get good quality burns at that speed. When you've chosen your write speed, click the 'Add' button as shown below. As if by magic, a new entry will appear in the list! Ok, now let's say you've got a few drives in your PC and you want to limit one of them to 4x on that media. Change the 'Device' drop down box so it says the drive you want it to and then change the speed for that drive to say 4x. When you've done that, click the 'Add' button as shown below. (Notice it's not the same one you clicked earlier!) Now you'll see there's a new 'Device' sub-entry under 'TYG02' and it lists '4x' by the side of it in the 'Write Speed' column. Great work, give yourself a pat on the back! In the screen below you can see I've added another entry so my Pioneer DVR-112L will burn them at 12x. (Although this is only 8x media, the Pioneer can 'overspeed' them and burn at 12x). Click on the 'OK' button when you're done. (otherwise it won't save the settings!) Now, whenever I insert a TYG02 disc, the program will examine that table to see if an entry for 'TYG02' exists (which it does!). It'll then search the sub-entries of 'TYG02' to see if there's one for the current drive. If there is, it'll use the drive's write speed setting (4x in the case of the Plextor, 12x in the case of the Pioneer). If there's not, it'll use the media one (8x). Here you can see it in action... First lets start with a drive that's NOT specified under the 'TYG02' entry. Notice how the speed no longer says 'MAX', but instead lists '8x', because that's what we selected as the media's default write speed. Now we see the Plextor drive has correctly picked up it's (drive specific) '4x' write speed setting. And finally, the Pioneer drive with it's (drive specific) '12x' write speed settings. Right, that's about it for this guide! Hopefully you get the idea and have been inspired to now go through all the discs you use, creating little 'profiles' for each one. When you're done, it might be an idea to 'Export' your AWS settings to a file and keep it somewhere safe incase you ever want/need to 'Import' them again after a reinstall/rebuild. Good luck and happy burning!
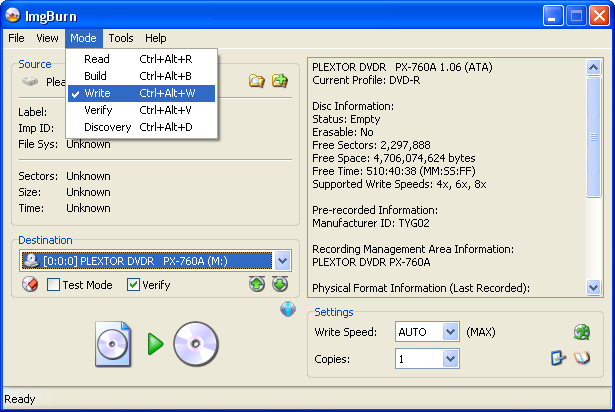


-
So i create a Video_ts folder and an iso using the build command in imgburn. im gussing it made a good iso so i try to burn it to my HP DVD+ 16x disks. I run it a 12x, it succeeds at that but cannot verify. Here is the log file I 19:24:55 ImgBurn Version 2.2.0.0 started! I 19:24:55 Microsoft Windows XP Media Center Edition (5.1, Build 2600 : Service Pack 2) I 19:24:55 Total Physical Memory: 1,047,016 KB - Available: 553,292 KB W 19:24:55 Drive D:\ (FAT32) does not support single files > 4 GB in size. I 19:24:55 Initialising SPTI... I 19:24:55 Searching for SCSI / ATAPI devices... I 19:24:55 Found 1 DVD?RW! I 19:37:27 Operation Started! I 19:37:27 Source File: C:\disk.iso I 19:37:27 Source File Sectors: 1,910,592 (MODE1/2048) I 19:37:27 Source File Size: 3,912,892,416 bytes I 19:37:27 Source File Volume Identifier: OURAN_HOST_CLUB_1_6 I 19:37:27 Source File Application Identifier: IMGBURN V2.2.0.0 - THE ULTIMATE IMAGE BURNER! I 19:37:27 Source File Implementation Identifier: ImgBurn I 19:37:27 Source File File System(s): ISO9660, UDF (1.02) I 19:37:27 Destination Device: [3:0:0] TSSTcorp CD/DVDW TS-H552L 0614 (E:) (ATA) I 19:37:27 Destination Media Type: DVD+R (Disc ID: CMC MAG-M01-00) (Speeds: 4x, 8x, 12x, 16x) I 19:37:27 Destination Media Sectors: 2,295,104 I 19:37:27 Write Mode: DVD I 19:37:27 Write Type: DAO I 19:37:27 Write Speed: 12x I 19:37:27 Link Size: Auto I 19:37:27 Test Mode: No I 19:37:27 BURN-Proof: Enabled I 19:37:27 Filling Buffer... (20 MB) I 19:37:28 Writing LeadIn... I 19:37:42 Writing Image... I 19:42:41 Synchronising Cache... I 19:42:47 Closing Track... I 19:42:50 Finalising Disc... I 19:43:02 Image MD5: 422b0e6974f99e5e6d0a8b4c41409966 I 19:43:02 Exporting Graph Data... I 19:43:02 Graph Data File: C:\Program Files\ImgBurn\TSSTcorp_CD-DVDW_TS-H552L_0614_THURSDAY-FEBRUARY-22-2007_7-37_PM_CMC_MAG-M01-00_12x.ibg I 19:43:02 Export Successfully Completed! I 19:43:02 Operation Successfully Completed! - Duration: 00:05:34 I 19:43:02 Average Write Rate: 12,822 KB/s (9.3x) - Maximum Write Rate: 16,777 KB/s (12.1x) I 19:43:02 Cycling Tray before Verify... W 19:43:09 Waiting for device to become ready... I 19:43:24 Device Ready! I 19:43:25 Operation Started! I 19:43:25 Source Device: [3:0:0] TSSTcorp CD/DVDW TS-H552L 0614 (E:) (ATA) I 19:43:25 Source Media Type: DVD+R (Book Type: DVD-ROM) (Disc ID: CMC MAG-M01-00) (Speeds: 4x, 8x, 12x, 16x) I 19:43:25 Image File: C:\disk.iso I 19:43:25 Image File Sectors: 1,910,592 (MODE1/2048) I 19:43:25 Image File Size: 3,912,892,416 bytes I 19:43:25 Image File Volume Identifier: OURAN_HOST_CLUB_1_6 I 19:43:25 Image File Application Identifier: IMGBURN V2.2.0.0 - THE ULTIMATE IMAGE BURNER! I 19:43:25 Image File Implementation Identifier: ImgBurn I 19:43:25 Image File File System(s): ISO9660, UDF (1.02) I 19:43:25 Verifying Sectors... (LBA: 0 - 1910591) W 19:43:52 Failed to read Sector 0 - Timeout on Logical Unit W 19:44:00 Failed to read Sector 1 - Timeout on Logical Unit W 19:44:08 Failed to read Sector 2 - Timeout on Logical Unit W 19:44:23 Failed to read Sector 3 - Timeout on Logical Unit W 19:44:31 Failed to read Sector 4 - Timeout on Logical Unit I 19:44:37 Abort Request Acknowledged E 19:44:38 Failed to Verify Sectors! I 19:44:38 Exporting Graph Data... I 19:44:38 Graph Data File: C:\Program Files\ImgBurn\TSSTcorp_CD-DVDW_TS-H552L_0614_THURSDAY-FEBRUARY-22-2007_7-37_PM_CMC_MAG-M01-00_12x.ibg I 19:44:38 Export Successfully Completed! E 19:44:38 Operation Aborted! - Duration: 00:01:13 I 19:44:38 Average Verify Rate: 0 KB/s (0.0x) - Maximum Verify Rate: 0 KB/s (0.0x) I 19:44:40 Close Request Acknowledged I 19:44:40 Closing Down... I 19:44:40 Shutting down SPTI... I 19:44:40 ImgBurn closed! i had to manual shutdown because it was failing to verify every sector. Can someone help?