

Cynthia
-
Posts
6,588 -
Joined
-
Last visited
Content Type
Profiles
Forums
Events
Posts posted by Cynthia
-
-
General Settings - Page 2

-
Advanced
-
Allocate Files On Creation
Files created in 'Read/Build Mode' will be preallocated. This cuts down on fragmentation.
The default setting is 'Enabled'.
. -
Calculate MD5 Hash Values
Calculates MD5 values for builds and images and displays them in the log.
I 00:00:00 Image MD5: 6a2ac4bec78830dddef06a0380e7741e
The default setting is 'Disabled'.
.-
Compare MD5 Hash Values
Only selectable if you also have enabled the option 'Calculate MD5 Hash Values'. If it it's enabled, ImgBurn will warn the user when the MD5 of a disc / image do not match after a Verify operation.
The default setting is 'Disabled'.
[*]Don't Analyse CD-DA Ready WAV Files
Option to stop the program from analysing (doing the dummy decode pass on) CD-DA ready WAV files in the 'Create CUE' file function.
The default setting is 'Enabled'.
.
[*]Create CUE - Preserve Full Pathnames
Preserve the full path of the files when creating the CUE file.
A cue sheet, or cue file, is a meta data file which describes how the tracks of a CD or DVD are laid out. Cue sheets are stored as plain text files and commonly have a ".cue" filename extension. For an audio CD, a cue sheet specifies titles and performers for the disc and its tracks as well as the names of one or more audio files to be used. Cue sheets are also used for many types of CD's in conjunction with an image file. The image file generally has a ".bin" extension.
The default setting is 'Disabled'.
.
[*]Create CUE - Save As ANSI File
If enabled, the CUE file will be saved as an ANSI file, instead of an Unicode file.
The default setting is 'Enabled'.
.
[*]Create DVD - Preserve Full Pathnames
Preserve the full path of the files when creating the DVD file which accompanies an ISO.
The default setting is 'Disabled'.
.
[*]Create DVD - Save As Ansi File
When this option is enabled, support for writing Unicode names into DVD files is enabled.
The default setting is 'Enabled'.
.
[*]Create MD5 - Preserve Full Pathnames
Preserve the full path of the files when creating the MDS file which accompanies an ISO.
The default setting is 'Disabled'.
.
[*]Create MDS - Save As Ansi File
When this option is enabled, support for writing Unicode names into MDS files is enabled.
The default setting is 'Enabled'.
.
[*]Parse File System Timeout
The allowed time to parse the file system during read and verify operations. Ranges from 10 seconds to 5 minutes.
The default setting is 'Enabled' and '30 Seconds'.
-
Compare MD5 Hash Values
[*]Log File
-
Add Header
Option to tell the program to include a header (program version + date) at the top of log files when saving them.
; //****************************************\\
; ImgBurn Version 2.5.3.0 - Log
; Friday, 24 September 2010, 17:14:44
; \\****************************************//
The default setting is 'Disabled'.
[*]Layer Break
-
Check 'Don't update IFO/BUP files'
Will automatically check this setting in the 'Create Layer Break Position' dialog window. It is used mainly if you have set or unset the non-seamless flag in a particular cell and want it kept that way.
The default setting is 'Disabled'.
. -
Check 'Seamless'
Will automatically check the seamless layer break option in the 'Create Layer Break Position' dialog window.
The difference between seamless layer change or a non-seamless layer change, is that with the seamless layer change, the switch between the first and second layer is less detectable. With the non-seamless layer change, there is a short pause when the DVD player switches between the layers.
While the seamless layer change would appear to be the best choice, some (mainly older) DVD players do not support the seamless feature, and may stop playing the disc once the switch point is reached. For that reason, it is a good idea to test your player(s) ability by burning a disc with the option enabled, to see if your player accepts seamless playback across the layer break (most modern players do). before you start use it as the default setting.
Also if this setting is enabled, ImgBurn no longer tells the previewer to insert a 1 second pause between cells.
The default setting is 'Disabled'.
. -
Show Interleaved Cells
Option that makes the program include interleaved cells (Multiple title-sets that share the same VOB) in the 'create/select layer break position' dialog.
An explanation of interleaved cells.
A cell is made of little parts (called VOBUs, beginning with a Nav PacK and followed by some video, audio and subpic packs.) A normal cell usually contains several VOBUs, unless it's a very short cell (such as a single frame.) Each VOBU has its own VOB/Cell ID combination.
An ILVed cell (interleaved cell) is a cell "mixed" with (at least) another ILVed cell. When the cells are interleaved, only one interleaved cell is played at a time. Interleaved cells are used in multi-angle Titles where the cell to play is determined by the current angle (previously defined by a SetSTN command, or by the user if he changes the angle with the remote.) It is possible to switch easily and (almost) in real time the current angle, as the player has just to finish playing the current VOBU, and then switch to the next VOBU in the other cell. The multi-angle technique is often used to translate some parts of the original image with words in foreign languages. There are many multi-angle examples in Disney DVDs.
Interleaved cells are also used in multi-story Titles. In this case, only one of the interleaved cells is declared in the cells list of the PGC, and it is therefore not possible to change the angle during the playback, and there is no need to define the angle with SetSTN. Another, totally different Title is defined elsewhere in the same titleset, and in that PGC, the other interleaved cell is used. Another difference between multi-angle and multi-story titles is that, in the latter, the duration of the interleaved cells doesn't have to be exactly identical. Therefore, the multi-story technique is used in DVDs with several versions of the same film, with little differences in the story (such as happy or sad ending.) Hence the "multi-story" name. True multi-story titles are very rare, but the multi-story technique can also be used for complex technical reasons, like in Matrix 1, to disable the white rabbit BOVs when playing the regular Title, or enabling them when playing the film via the bonus menu. In this case, it's the subpic streams that are different in the interleaved cells, not the video stream. Credit: r0lZ
An example.- With the setting disabled.
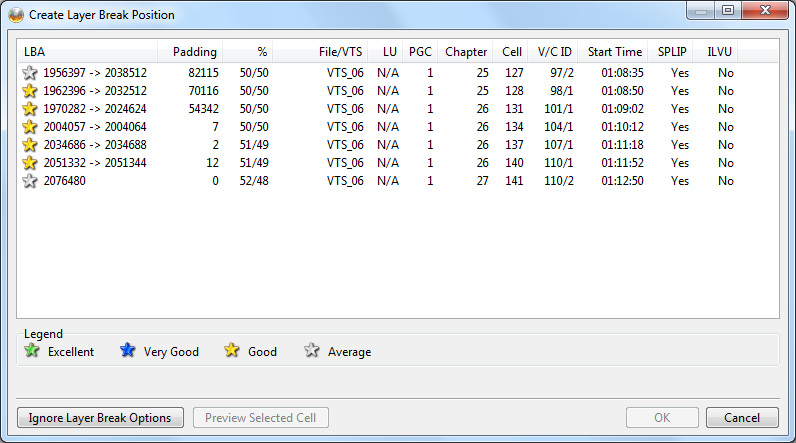
. - With the setting enabled.
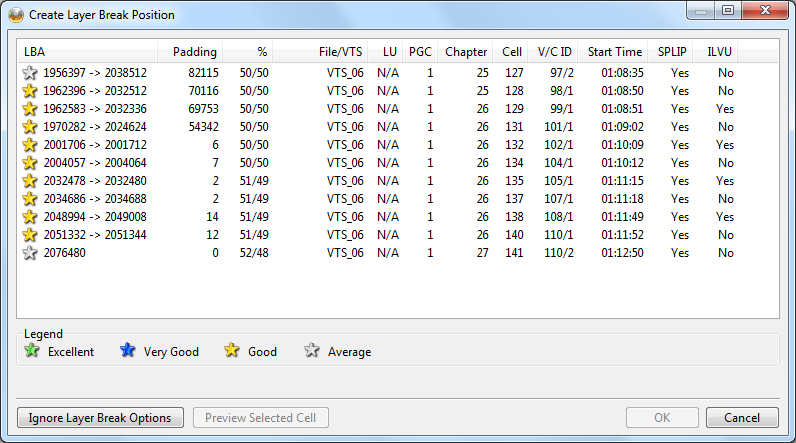
The default setting is 'Disabled'.
- With the setting disabled.
[*]ImgBurnPreview Options
-
ImgBurnPreview File Name
The preview is used to display conveniently what the video looks like at your selected layer break position on dual layer builds.
If you wish to use an alternative DVD2AVI implementation, enter its EXE here.
The default setting is 'C:\Program Files\ImgBurn\ImgBurnPreview.exe'.
. -
Show Information
Makes the ImgBurnPreview program to show the information window automatically when the preview function is launched.

The default setting is 'Disabled'.
. -
Show Real Size (1:1)
Starts the ImgBurnPreview window in full size, instead of the default small size.
The default setting is 'Disabled'.
. -
Don't Enable Sound
Normally the sound in the 'Layer Break Position' preview window will be turned on by selecting the first audio stream in the title domain. On some systems this might cause playback problems. By enabling this option, the default sound setting will be set to 'Silent' in the drop down box in the 'Layer Break Position' preview window.
The default setting is 'Disabled'.
. -
Don't Limit Frames Per Second
This option will make the playback in the preview window go faster than a normal 1x speed playback (25 frames per second). The actual speed, if this setting is enabled, depends on your computers hardware.
The default setting is 'Disabled'.
. -
Don't Use DirectDraw Overlays
Direct draw overlays use the very low level overlay buffer, which is much faster than the usual way of displaying video to the screen.
If your video card does not support the DirectDraw overlay function or you run the program under Linux's Wine, it can be disabled with this setting. On some systems the preview may actually be faster if this option is disabled.
The default setting is 'Disabled'.
[*]Reset ImgBurn Statistics
Sets the value to zero in the 'ImgBurn Statistics' window.

-
Allocate Files On Creation
-
Advanced
-
General Settings - Page 1

-
Options
-
Always Use Legacy Folder Picker
The windows style of the built-in dialogues that you use for File-Open, File-Save and Browse for file/folder operations.
In Windows Vista and later Windows versions, Microsoft updated the common file dialogues, this time to make them similar to regular Explorer windows. The file-open and file-save dialogues now have a built-in search field as well as the Favorite Links/tree view pane that are in all Explorer windows.

If you enable this option, the used windows style will be the old Windows 9x style.

Note: This setting is only valid if you are running Windows Vista or later Windows versions.
The default setting is 'Disabled'.
. -
Don't Show Status Bar Messages
If enabled you will not see the status bar messages that shows up in the lower left corner in the 'EZ-Mode Picker' window. The standard messages contains funny quotes from movies and TV shows.
By creating a plain text file with the name 'StatusBarMessages.txt' in the ImgBurn program folder, it's possible to create your own compilation of status bar messages to be used instead of the default ones.
The default setting is 'Disabled'.
. -
Minimize To System Tray
When enabling this option, ImgBurn will minimize itself as an icon to the system tray. (The system tray is where your PC clock is located.)If you want to bring the ImgBurn window backup, you would double click the "CD" looking icon. Alternatively, you could right click on the "CD" looking icon and then left click on "Restore ImgBurn".

The default setting is 'Disabled'.-
In Windows XP

. -
In Windows 7

[*]Prevent Entering Stand By
When this option is enabled, ImgBurn will attempt to stop the computer from going into standby whilst it's burning.
The default setting is 'Enabled'.
.
[*]Prevent Screen Saver From Starting
For those who don't want any CPU to be wasted during a burn.
The default setting is 'Disabled'.
.
[*]Show 'Shutdown' Window
Will display your shut down option after the action has completed.
The default setting is 'Enabled'.
.
[*]Shutdown Action
You can select the shutdown option here, that you want to be carried out after that ImgBurn has finished it's tasks. The different modes are the same as in Windows.
Both of the options 'Shut Down' and 'Power Off' will perform the same task. One uses the 'EWX_SHUTDOWN' flag while the other uses the 'EWX_POWEROFF' flag. Some messed up machines just don't work with one but will with the other.The default setting is 'Disabled'.
-
None
-
Log Off
-
Restart
-
Shut Down
-
Power Off
-
Stand By
-
Hibernate
[*]Never Force Shutdown Action
If enabled, the shutdown action will not take place if there are still other programs running. If disabled, this option will shut down your computer in any situation.
The default setting is 'Disabled'.
.
[*]Syncronise Build / Write / Discovery Options
A change of the settings 'Write Speed, 'Copies', 'Test Mode' and 'Verify' in one of the 'Modes' user inter face, will automatically change the same setting(s) in the other two 'Modes' for you.
The default setting is 'Enabled'.
-
In Windows XP
[*]Language
-
Language
You can have the user interface in your own native language by selecting it here.
If the desired language file is not already installed in your computer, you need to do this first from the ImgBurn Download Page. These files needs to be extracted to a 'Languages' folder wherever ImgBurn is installed. (i.e. C:\Program Files\ImgBurn\Languages)-
System Default
Option to use the system default language. When an exact match cannot be found (i.e. the correct translation file is missing from the Languages folder), the program will attempt a partial match, like in this case when a local language variant of a the Swedish language file is installed instead.
W 00:00:00 Language not available! - Name: 'Swedish (Sweden)', LCID: 1053 / 0x041D
W 00:00:00 Language partial match! - Name: 'Swedish (Finland)', LCID: 2077 / 0x081D
. -
User Specified
In this option you manually select amongst the installed language files the desired language to set for the user interface.
The default setting is 'English (United Kingdom)'.
[*]BiDi Mode
Allows you to decide if 'BiDiMode' (Bi-Directional support for fonts) is to be set to 'Left To Right' or 'Right To Left'.
Bi-directional text is text containing text in both text directionalities, both right-to-left (RTL) and left-to-right (LTR). Some writing systems of the world, notably the Arabic (including variants such as Nasta'liq), Persian and Hebrew scripts, are written in a form known as right-to-left (RTL), in which writing begins at the right-hand side of a page and concludes at the left-hand side. This is different from the left-to-right (LTR) direction used by most languages in the world. When LTR text is mixed with RTL in the same paragraph, each type of text should be written in its own direction, which is known as bi-directional text.
The default setting is 'Left To Right'.
-
System Default
-
Always Use Legacy Folder Picker
-
Display Warnings
-
Don't Update IFO/BUP Files
Warns you when checking the 'Don't update IFO/BUP files' box in the layer break dialog window in the 'Build Mode'.

The default setting is 'Enabled'.
. -
Images Still Queued
Prompts to save the Queue when you exit the program if there is more than one image in the queue.

The default setting is 'Enabled'.
. -
Interfering Programs
A check for 'AnyDVD', 'DVD43' and 'DVD Region+CSS Free' - as they could potentially modify data when it's being verified - resulting in a 'Mis compare' error.
W 00:00:00 DVD43 can interfere with ImgBurn's ability to verify accurately, please ensure it's disabled!
It also checks if the driver sptd.sys from Duplex Secure Ltd is present in the system. This driver is used by Deamon Tools and Alcohol 120%. Older versions of this driver can slow down I/O and basically limit the top speed of your drive when reading/verifying (for some drives on some machines). Only PATA and DVD -R discs were affected. Recent versions, as version 1.81 and above of the sptd.sys driver, doesn't suffer from this behaviour.
Even if you have uninstalled Daemon Tools and/or Alcohol 120% the driver might still be present in your system and in such case you need to uninstall it through the 'SPTD setup file'.
W 00:00:00 Duplex Secure's SPTD driver can have a detrimental effect on drive performance.
The default setting is 'Enabled'.
. -
Layer Break On DVD-R DL
When burning DVD-R DL media and Layer Jump Recording is not supported/being used.

W 00:00:00 Cannot set the layer break position when burning DVD-R DL media.
The default setting is 'Enabled'.
. -
Maximum File Size
With this option you can decide if you want the FAT32 4GB max file size warning in the log should show up or not.
If enabled you will see a warning in the log file.
W 00:00:00 Drive C:\ (FAT32) does not support single files > 4 GB
The default setting is 'Enabled'.
. -
Overburning
Warns if the image is larger than the default disc size.

W 00:00:00 User accepted disc space warning and is attempting to overburn!
The default setting is 'Enabled'.
. -
Protected Disc
ImgBurn can not read from protected sources.

The default setting is 'Enabled'.
. -
Seamless Layer Break
Warns you when checking the 'Seamless' box in the layer break dialog window.

The default setting is 'Enabled'.
. -
Select MDS File Not ISO
This will tell you to select the MDS file rather than the ISO file when you select an ISO file for burning and its MDS file exists.
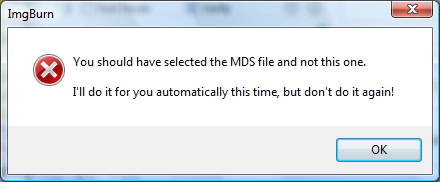
In most cases you should select the .ISO file when you want to burn the image. In some cases there is the need to select the .MDS file instead:
.The default setting is 'Enabled'.-
Your hard disk is not NTFS formatted
As Windows 98 and some other older Windows versions are based on the FAT 32 file system (and a lot of people still use this even under Windows XP) which cannot handle files larger than 4 GB and ISO files containing movie data usually are larger than 4 GB, the created ISO is split on such systems into a multi part or segmented ISO which consists of several 1 GB files with an enumerated extension like .i01, .i02 and a .mds file of a few bytes which holds info on the parts.
. -
You are going to burn to a DL disc
MDS is just a file that is generated along with the ISO file when making a 1:1 copy or creating an ISO file on your hard drive. It just basically tells your burner where to put the layer break for dual layer burning.
[*]Test Mode Enabled
This will allow you to configure if the program should tell you that you have the Test Mode enabled when you write to a disc.

The default setting is 'Enabled'.
.
[*]Test Mode Not Supported
Option to not show the 'Test mode not/might not be support' warning message when you write to a disc.
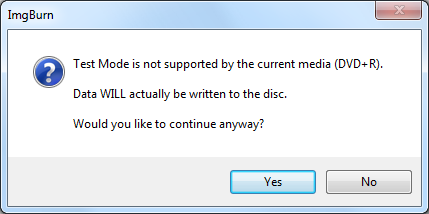
The default setting is 'Enabled'.
.
[*]Underburning
This will allow you to configure if the program should tell you that you can burn to a single layer disc and don't need to use the double layer disc in the drive.

The default setting is 'Enabled'.
.
[*]Write Mode Not Build Mode
If you select an image file in the import file dialog in the 'Build Mode'.

The default setting is 'Enabled'.
-
Your hard disk is not NTFS formatted
[*]Font
-
Set GUI Font
You can here select the desired font to be used by the program's GUI (Graphical User Interface).
If you want to change the default GUI font, then first enable the option 'Set GUI Font' and then use the folder browser button to activate the 'Choose Font' window.
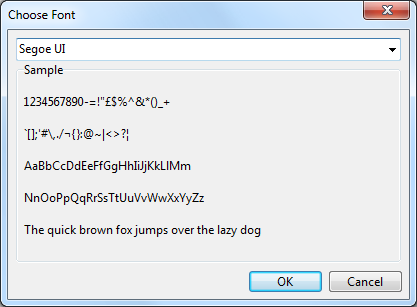
Segoe UI (pronounced "SEE-go") is the Windows system font. When the GUI font is set to 'Segoe UI', the program uses size 9 rather than size 8 as the default character size.
The default setting is 'Disabled' and 'Segoe UI'.
-
Don't Update IFO/BUP Files
-
Options
-
The ImgBurn Settings
This guide will explain the various registry settings, that can be changed by the user.
The 'Settings' window is found in this location
Main Menu -> Tools -> Settings...
-
The Tabs

General Read Build Write Verify Graph Data I/O Device Sounds Events Registry File Locations
.
-
Default Settings
The default setting is showed in blue in this guide.
In most cases you will not need to change any of the default settings. The program is already optimized for the normal end-user.
If you have changed any settings and want to use the default ones instead, simply press the 'Restore Defaults' button. The program will ask you if you really want to reset the settings.

-
Yes
Your changes will be reverted back to default values.
.
-
No
Only the current tab will be reverted back to default settings.
.
-
Cancel
Will leave the settings as they are and abort the pop-up window.
-
Yes
-
The Tabs
-
Hi and welcome to the forum, amstel!

Install the latest firmware for your burner. That might do the trick.
Right now you have the MSOF version installed.
I 19:18:27 Destination Device: [0:0:0] LITE-ON DVDRW SHM-165P6S MS0F (D:) (ATA)http://forum.rpc1.org/dl_firmware.php?download_id=2176
- No disc in the burner
- All other programs closed
- The tray closed
- No disc in the burner
-
-
-
TSSTcorp = Toshiba Samsung Storage Technology Corporation
Does the booktype have to change to record onto a dvd+R disk ?No. In the old days some stand alone players had serious problems playing burned discs and if it saw the disc as a DVD-ROM it could play it.
I don't use bit setting on my + SL discs.
For +DL media it seems vital to use bit setting.
-
-
I've updated to the newest firmware
I 09:42:57 Destination Device: [1:0:0] TSSTcorp CD/DVDW SH-S182D SB05 (E:) (ATA)
There is a later version SB06.
http://www.samsungodd.com/eng/Firmware/FWD...ode=&os_no=
-
Tried to do some search of later firmware for this burner and it's tricky to find.
There is a discussion on a Swedish board if this one is for your burner or not.
http://www.techspot.com/drivers/driver/fil...formation/8137/
As both you and the one in that forum has the "D" added to the model name - the thread never found a solution to it.
If your burner is also in a Sony/VAIO computer - try to use the Sony web page and see if you can find something for your specific computer model or send a mail to Sony support.
The firmware installer will tell you if it's for your burner or not. I suggest you first try to use another brand of discs as post #2 suggests.
-
Hmmmmmm...ImgBurn does sound a lot like Burger King now doesn't it.....

Fried chips contra fried burners...

-
Main Menu -> Tools -> Show IFO Layer break info. Select the ISO file and that should show the current layer-break.
Then Main Menu -> Tools -> Create .mds file and then insert the layer-break value and create a new .mds file.
I never tried this - so I'm not sure how well the ending will be.
Another option:
Extract the ISO file with a program like 7-Zip and then use the Build mode to create a new ISO/MDS.
-
Is it ISO Burn or ImgBurn you are trying to burn with?
-
I 18:12:08 Operation Successfully Completed! - Duration: 00:16:35
I 18:12:08 Average Write Rate: 2,659 KB/s (1.9x) - Maximum Write Rate: 8,323 KB/s (6.0x)
Tried to search for firmware updates for that model of burner for some days ago - but couldn't find anything for that burner.
Have you checked that you are in DMA mode and not in PIO mode? It's a very slow burning speed and your discs are rated for 8x burning.
-
Hi and welcome to the forum, klideas!
In what format is the file you try to burn?
Can you post a log from your burning attemp?
-
I've never seen any on sale here around. Seems the -RW DL's should be out this year.
World -
Hi and welcome to the forum, Sacrilicioius!
Can you post a log from that burning?
You will find the log in this place: Main Menu -> Help -> ImgBurn Logs
-
Could it be that this image is smaller than the ones you used to burn with the old version?
If I remember it right - that part of the burning can make the burner to burn more than the actual image size for some compatibility reason. I had the same issue with some RW discs in the past. It also took a long time in that phase. Can't remember if it was + or - RW's.
-
-
If you burn directly from your VIDEO_TS folder - it's that one that gets verified against the burned disc.
-
Hi and welcome to the forum, bmac!
I 23:19:49 Destination Media Type: DVD-R (Disc ID: MCC 03RG20) (Speeds: 1x, 2x, 4x)You firmware is very old. I guess they are rated for faster burning than 4X speed on the box?
Install the latest firmware for your burner. It's ver BYX5.
http://forum.rpc1.org/dl_firmware.php?download_id=1917
When you flash the drive:
- No disc in the burner
- All other programs closed
- The tray inserted
- No disc in the burner
-
I tried to search for an update - but I couldn\'t find any. The same result did mmalves get in post #2.
And TEAC's firmware page don't even mention your model.
http://dspd.teac.de/index.php?id=477&L=1
The only thing is perhaps to send a mail to TEAC's support and ask if there is a new firmware for your model.
-
I 13:01:59 ImgBurn Version 2.1.0.0 started!
There is a later version.
-


The ImgBurn Settings
in Guides
Posted
Read Settings - Page 1
- Options
-
File Splitting
- Auto
- 650 MB
- 700 MB
- 780 MB
- 810 MB
- 870 MB
- 890 MB
- 1 GB
- 2 GB
- 4 GB
- 4.37 GB
- 4.4 GB
- 4.45 GB
- 4.5 GB
- 4.55 GB
- 4.6 GB
- 4.65 GB
- 4.7 GB
- 7.95 GB
- 23.3 GB
- 46.6 GB
- None
- Disc Capacity
- DVD+RW always show themselves as being the full 4.37 GB in size, because of the formatting process.
-
Disc
-
File System
-
Create Image Layout File
-
Auto
- File splitting has been used and there's more than 1 file that goes to make up the complete ISO, hence MDS is needed to piece it back together.
- The ISO is a double layer image that, hence MDS is needed to tell ImgBurn where it is (without ImgBurn needing to search for it again).
- The ISO is under 1GB in size, hence the MDS is needed so that DAEMON Tools etc will switch to 'DVD' mode rather than being in 'CD' mode.
-
Yes
-
No
-
Image Layout File Format
-
CCD
-
CUE
-
DVD
-
MDS
-
Audio CD - Default To WAV File
-
Create MD5 File
-
Check 'Close Program'
-
Check 'Shutdown Computer'
-
Auto 'Export Graph Data'
- , DVDInfoPro or Opti Drive Control.
-
Enable SpeedRead DVD (Plextor)
-
Process Priority
-
Default Destination
-
None
-
Generated Automatically
-
Most Recently Used
-
Image Files Folder
-
Custom
- Read Errors
-
Software Retries
-
Hardware Retries
-
Ignore Read Errors
-
PreGap Options
-
Detection Method
- 1 = Read CD
- 2 = Read SubChannel
- 3 = Read CDDA
-
The default setting is '1-2-3'.
PreGap SnappingThis setting tells ImgBurn how to set the output file size of image files. The setting is required because some operating systems (such as Windows 9x/Me) have file size limits (a single file cannot be over 4 GB in size). Setting it to "Auto" will do the job in most cases, and ImgBurn will split your ISO files based on the file size limits of your OS.
This option will cause 'Read Mode' to read that full 4.37 GB, even if only 100 MB was written on the disc.
.
This option will attempt 'Read Mode' to find out how many sectors of REAL data that are actually on the disc (by looking at various fields in the file system) and that amount will be read instead.
Image Layout Files are optional media descriptor files that can be generated when creating a disc image from a CD or DVD. The purpose is mainly to hold information about the image file, such as the position of the layer breaks or layer breach bit and if the image file is split into several smaller files due to file size limitations of older disk file systems, to hold the information of those files that's making up the image file.
Several programs use this Image Layout File to be able to mount or burn image file in a correct way.
ImgBurn will create the selected Image Layout Files, that have been selected in the 'Image Layout File Format' option, only when it's appropriate.
The MDS file will be created if:
Always creates the selected Image Layout Files, that have been selected in the 'Image Layout File Format' option.
.
Only creates a MDS file for FAT 32 file systems when the image file is splitted into several 1 GB files.
With these options you can select the various image layout file formats you want to be generated when creating a disc image from a CD, DVD, Blu-ray or HD-DVD.
The .CCD (CloneCD Control) file is simply an ASCII text file that holds information about the image file. With the help of this file you can mount Audio CD's onto virtual CD drives with programs like Virtual Clone Drive or Daemon Tools.
The image data file needs to be named *.IMG, as that's what Virtual Clone Driver looks for.
The default setting is 'Disabled'.
.
A .CUE file (cue sheet) is a plain text file containing commands with one or more parameters. These commands describe the data as a whole as well as individual tracks are laid out of a CD or DVD.
The default setting is 'Disabled'.
.
The .DVD file basically contains this information:In the past the .DVD file was needed for mounting HD-DVDs and BDs when using Virtual Clone Drive. The file contained the MediaType of the ISO image and told Virtual Clone Drive what type of image it was mounting. Recent versions of Virtual Clone Drive now detects the UDF directly from the ISO image so the .DVD file is no longer necessary.
The default setting is 'Disabled'.
.
MDS is just a file that is generated along with the ISO file when making a 1:1 copy or creating an ISO file on your hard drive. The MDS file contains metadata about the original media, specifically the position of the layer break and is needed to tell your burner where to put the layer break for dual layer burning. The format is a binary file with the "MEDIA DESCRIPTOR" appearing in the beginning of the file.
As Windows 95/98/Me and some other older Windows versions are based on the FAT 32 file system (and a lot of people still use this even under Windows XP/Vista) which cannot handle files larger than 4 GB and ISO files containing movie data usually are larger than 4 GB, the created ISO is split on such systems into a multi part or segmented ISO which consists of several 1 GB files with an enumerated extension like .i01, .i02 and a .mds file of a few bytes which holds info on the parts.
The default setting is 'Enabled'.
Allows you to save an Audio CD as a CUE/WAV (instead of CUE/BIN).
The default setting is 'Disabled'.
.
This setting is only available if you also have enabled the 'Calculate MD5 Hash Values' in the Settings 'General' tab.
It will create a text file with the same name as your image and add the extension '.md5'. The default setting is 'Disabled'.
.
This will pre-check this option in the 'Read Mode' window.
The default setting is 'Disabled'.
.
This will pre-check this option in the 'Read Mode' window.
The default setting is 'Disabled'.
.
Data captured during the read (read speed, buffer levels etc) can be displayed / analysed using either BurnPlot
The default setting is 'Enabled'.
.
SpeedRead allows the user to change the reading of DVD media up to the maximum speed of the drive. Discs that may be damaged due to mishandling or improper use may shatter due to the higher rotational forces reached at the maximum read speed of the drive. The drive's maximum read speed is therefore limited as a safety function. When you enable the SpeedRead DVD option the drive will read DVD Video discs at maximum speed. Plextor recommends examining each disc before enabling this function.
The default setting is 'Enabled'.
.
In a multi-tasking system like Windows, it is necessary to assign different priorities to different tasks. By assigning a higher priority to more important tasks such as CD/DVD writing software, Windows ensures that critical tasks do not get interrupted by less important background tasks, like virus scanners or printer spoolers.
You can choose one of the following priorities: 'Realtime', 'High', 'Above Normal', 'Normal', 'Below Normal', or 'Idle'. The lower the priority is, the lower percentage of CPU time will be delegated to this task.
Note that depending on the process and your administrative rights to your machine, you may not be able to change a particular process's priority.
The default setting is 'Normal'.
This option allows you to select where you want ImgBurn to save the output file(s).
ImgBurn don't suggest a saving place or a file name. You have to select it manually.
.
ImgBurn will use the hard disk with the largest free space to read the CD/DVD to. It will also generate a new name for the output file using the name of the DVD, i.e. NAME.iso. For CD's and if the source is recorded using 'Mode 1' (2048 bytes per sector) an ISO will be created and for 'Mode 2' (2352 bytes per sector) it will be in a BIN/CUE setup.
When calculating the automatic destination path, ImgBurn checks that the user has permission to write to the folder. As it normally goes to the root folder of the drive, this fails under Windows Vista when running as a 'Normal' user. Now it will realise that and point to the 'My Documents' folder instead.
.
It will use the latest place you saved to.
.
Selecting this will make the program default to saving in the 'Image Files' folder as specified on the 'File Locations' tab.
.
Always defaults to the specified destination - regardless of any manual changes you have made via the 'Browse' button. The destination specified here is ONLY used if it is set on 'Custom'. It is nothing to do with automatic.
You can set how many times a failed read operation is retried until ImgBurn gives up. The higher the value you select there the more ImgBurn will try to read a sector before giving up.
It can be set to a digit between 0 and 20.
The default setting is '20'.
.
This is for the drive itself, not the program. Not all drives support setting the number of retries they perform on an error. The drive performs X 'hardware retries' for Y 'software retries' made by the program. So in total retries = X * Y.
It can be set to a digit between 0 and 20.
The default setting is 'Disabled' and '2'.
.
This will result in ImgBurn just skipping sectors it can't read.
The default setting is 'Disabled'.
This is for the 'Create CD CUE' module.
The PreGap on an Audio CD is the portion of the audio track that precedes "index 01" for a given track in the table of contents (TOC).
Option where you can configure the PreGap detection command order.
.
Gaps will snap to the nearest second (multiple of 75 frames) if within the specified range. (i.e. 1 second, 72 frames will snap to 2 seconds). It can be turned off by setting the value to 0. This option only applies when reading a disc, not writing one.
The default setting is '5 Frames'.