

Cynthia
-
Posts
6,588 -
Joined
-
Last visited
Content Type
Profiles
Forums
Events
Posts posted by Cynthia
-
-
Internal or external burner?
If internal;
In that guide Dialysis1 posted - in the last part there is suggestion to;
Sometimes the DMA/PIO mode "sticks" and won't change when you try to select DMA.You can delete the secondary channel IDE controller from Control Panel. Then reboot your system and the system will reinstall the controller when you reboot. This often fixes this problem.
Have you tried that?
-
Yes. You need to use Read mode and then Write mode for that purpose.

-
Hi and welcome to the forum, eclipse959!
Here is a list of what media the player likes:
http://www.videohelp.com/dvdplayers/panasonic-s35/2473
It looks as it likes burned discs.
Are you able to play burned single layer discs?
The DL disc can be played in your computer?
-
Well, if you use an encoder/transcoder - the picture quality will have an affect on the output compared to the original one. But the pure burning program itself will still not change the picture/sound quality.
-
Curious.
Can you see on the package if those Verbatims come from India or Singapore?
-
The picture quality (or sound) has nothing to do with the burning program used. If you experience playback problems (as pixelations) that is most common due to low quality discs or that the burner don't like the brand of discs you use.
Write mode only burns already prepared image files. If you don't have one - you need to use Build mode to create one (or burn directly to the burner). Read Mode - if you want to read an already burned disc into an image file. Verify Mode is used to verify a burned disc against an image saved on your computer. The last mode - Discovery is if you want to do some test burns with your discs using dummy data.
If the RW disc is not empty - ImgBurn will format it for you when you start the burning. No need to press the button first.
-
How to deal with 'The End of The World' problem
In this guide you will see how the problem with ImgBurn not being able to find any cells, that can be used for the layer-break when you want to burn a DVD DL disc, can be solved.
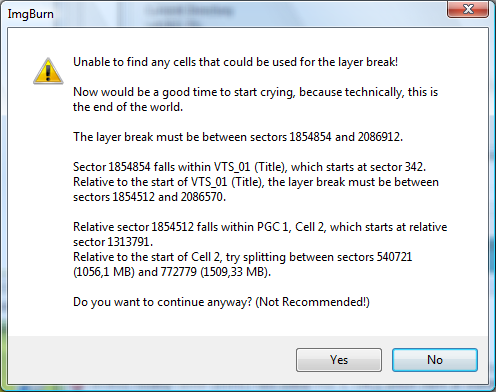
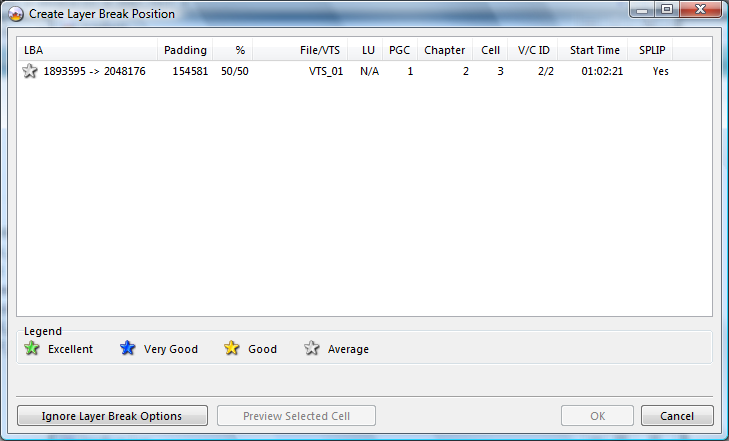
This is an example of the window you will see in such a case.
To solve the problem, we are going to use VobBlanker. If you don't already have VobBlanker installed, download it from VobBlanker's homepage. The program is free.
The information from the ImgBurn window that we need is marked with red in this text:
Sector 1854854 falls within VTS_01 (Title), which starts at sector 342.Relative sector 1854512 falls within PGC 1, Cell 2, which starts at relative sector 1313791.
Relative to the start of Cell 2, try splitting between sectors 5400721 (1056.1 MB) and 772779 (1509,33 MB).
Note: The VTS, PGC, Cell and sector values will be different in your own case.
-
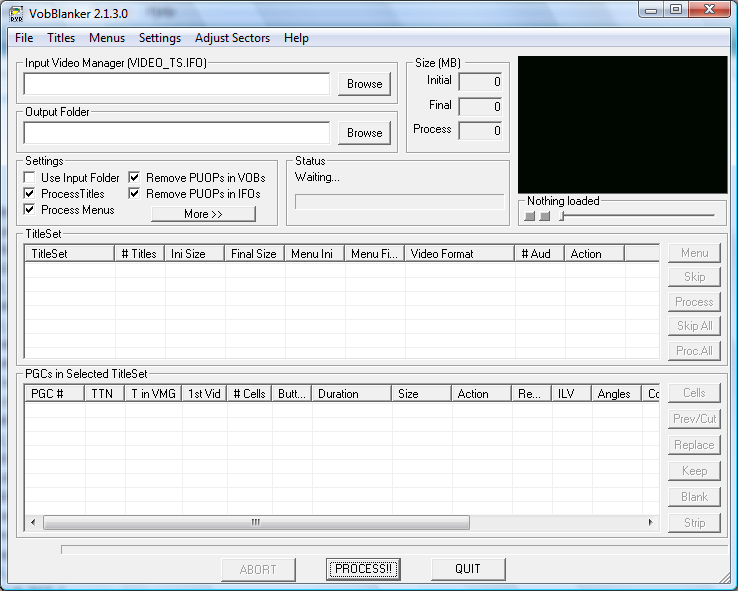
Start VobBlanker.
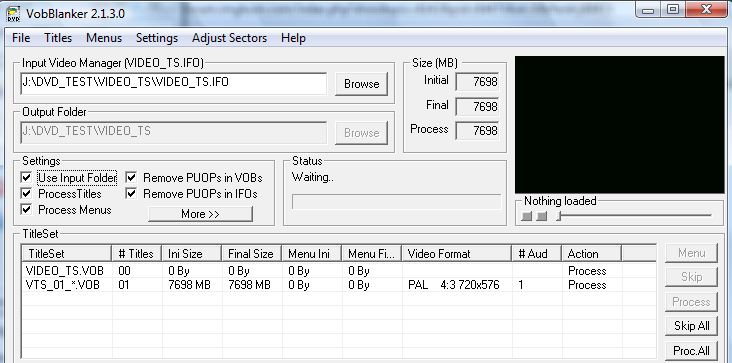
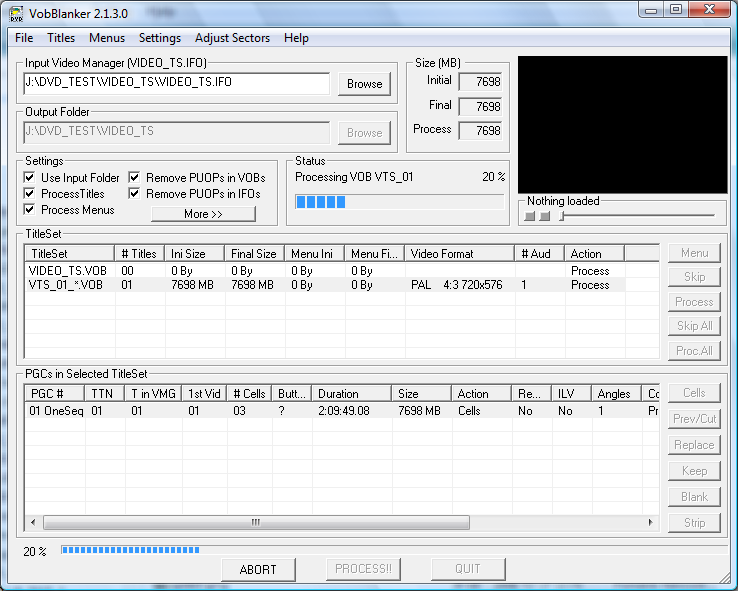
You will now see the programs main window.

. -
Press the button 'Browse' in the Input Video Manager window.
Browse to your VIDEO_TS folder and select the VIDEO_TS.IFO file. Also 'check mark' the option 'Use Input Folder'. After this you should see the DVD's Title set.
. -
Select the Title Set.
We know that the Title Set we are going to use is VTS_01. Click on that row and the PGC's in this Title Set will be showed.

. -
Select the PGC.
We also know that we are going to use PGC 1.
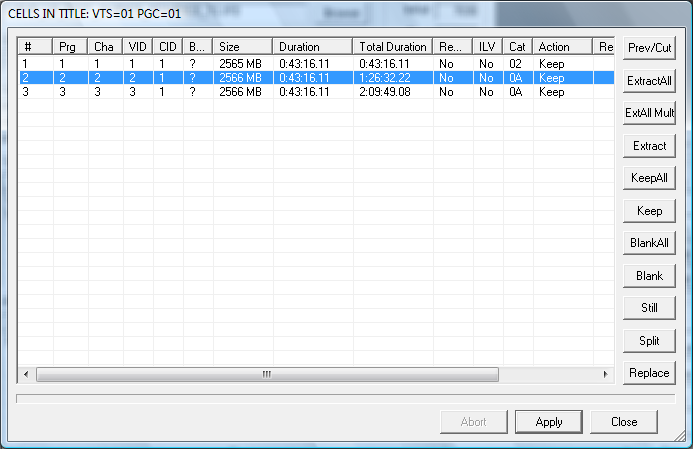
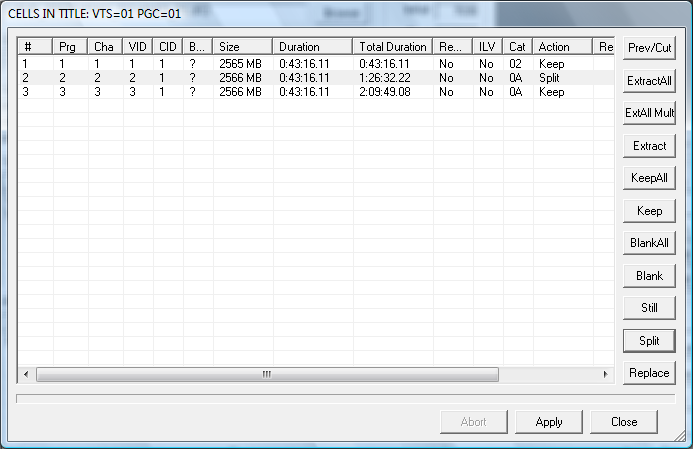
Double click on the row for PGC 1 and you will see the 'Cells In Title' window.

. -
Select the Cell.
Based on the information from ImgBurn, we know that we need to split cell 2 into at least one new cell, so click on the row for Cell 2.
. -
Press the button 'Split'.
This will bring up the 'Cell Split Mode' window.
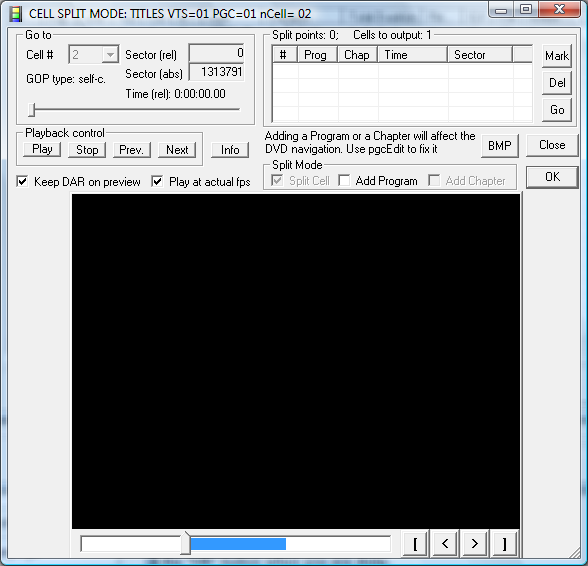
Untick the options 'Add program' and 'Add Chapter' in the 'Split Mode' options box.
Play the movie by using the button 'Play' and try to find a good place for the layer break, as a set or camera change. During the play or when you move the glider (use the one in the upper left corner, not the one in the bottom of the window), you can see the current sector value in the box 'Sector (rel)'. We know that the split must be between relative sector 540721 and 772779.
For fine tuning, you can use the 'Prev' or 'Next' button to select an exact frame. (Note: It is sometimes not quite possible to select an exact frame as the split needs to be made at the start of a Group of Pictures, which occur every 0.5 seconds or so).
I've chosen to use relative sector 579462 as the split point.
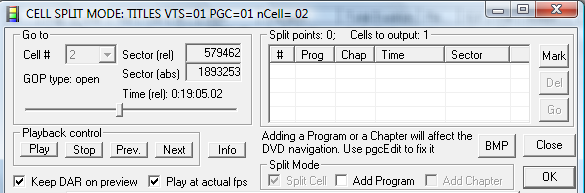
When you want to set the split point for a new cell - press the button 'Mark' and the split point will be added.
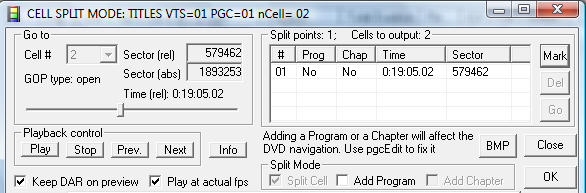
You can define up to 32 split points per cell in the same VobBlanker session.
. -
Press the 'OK' button when you are done.
This will bring you back to the 'Cells In Title' window.
. -
Press the 'Apply' button.
You will see the programs main window again.
We are now ready to let VobBlanker process the files and create the split(s).
. -
Press the 'PROCESS!!' button.
. -
Close VobBlanker.
After that VobBlanker is done, close it down by pressing the 'QUIT' button.
. -
Start ImgBurn.
You can now start ImgBurn and run the Build mode again.
ImgBurn should now be able to find a cell that can be used for the layer-break.
-
Start VobBlanker.
-
Do you have the burner attached as master in the settings (switches) at the back of the burner?
-
That RW disc is it scratched and/or heavily used?
-
Can you post a log from that formatting try?
If the log exists - you should be able to find it here:
Main Menu -> Help -> ImgBurn Logs
I know that Nero sometimes is a bit faster in the formatting as it don't do a full erase and it sometimes can look as the formatting has "hanged" in ImgBurn. I've seen this with my 1X RW Verbatim discs. Everything take ages with those discs. But it has always completed the formatting.
If You can't find the log. Do a new burning try with that RW disc and then post the log from that try.
-
burning episodesI 19:57:44 Contents: 1 File, 0 Folders
Curious...
In what format is that file? DivX?
-
Hi and welcome to the forum, aztec!
Can you post a log file from one of these burns with the Sony +RW's?
You can find the log files here:
Main Menu -> Help -> ImgBurn Log files
But it sounds as your stand alone player don't like that brand of discs.
-
-
New PC build
in Chat
Another option is to get a new (perhaps faster) SATA hard disk as O/S disk and still use the "old" Benq/Nec and put the old PATA hard disk into the JMicron connector. I guess the 120GB disk is rather old and I never trust old hard disk to be running as main disk as there are some life time limit - so I always feel it's safer to get a new disk when I build a new computer.
-
New PC build
in Chat
I have the Asus P5W DH DELUXE and no problems with the JMicron RAID/SATA/PATA controller. If I remember it right you can't connect CD/DVD devices (ATAPI) to the JMicron PATA connectors.
-
New PC build
in Chat
That's the Asus P5K-E/WiFi-AP, S775, iP35, DDR2, 2xPCI-E, 2xGLAN, WLAN model?
-
Hi and welcome to the forum, martosurf!
SPTI is not avilable in Windows 95/98/Me - so in those you need one of the other four. For later Windows versions - select it according to mmalves post.
-
So what the hell what I looking at?
Perhaps at your avatar...

-
Might be worth your time to visit CDFreaks.com and see if Liggy and Dee would be able to work up a bitsetting firmware for your drive...I think that would do the trick TBH.I 13:45:53 Source Media Type: DVD+R (Book Type: DVD-ROM) (Disc ID: TDK-003-00) (Speeds: 2.4x, 4x, 6x, 8x)
Isn't bitsetting already applied in that burn?
@CynthiaDo you use the NEC tab to set the booktype with your Optiarc drive and do the new drives require modified firmware like the good old NEC models?
No, I use original firmware for my Nec's. So that tab is still collecting dust here.
Yes, you need modified firmware for +R SL discs to do the bitsetting.
-
Well, there is very little on the internet about your burner and even less about any firmware update. Sorry.
-
In the preferences in DVD Flick I checkmarked the option "Create ISO" and that seems to trigger the burning with ImgBurn. (I guess you need to have ISO files associated with ImgBurn in the preferences of ImgBurn).
Tried to search for firmware for your burner. It seems it's installed in a Compaq or Dell computer. I couldn't find any firmware for that burner. If it's a Compaq/Dell computer - try to see if you have any luck with using their support pages for your specific model of computer.
-
Suggest that you try to play the burned DVD in another stand alone player. It could be that the player is tricky with burned discs.
Tried to find some reviews about your player - there are two models that fit your description:
http://www.videohelp.com/dvdplayers?DVDnam...ame&hits=50
(Scroll down a bit on that page to find the two models)
-
Yes, the latest log looks ok.
Can you play that DVD in your computer?
Never tried DVD Flick before - so I tried it and it seems that the latest version just tried to burn the created stuff to ImgBurn by itself.
-
If you are going to burn those DVD files as a compliant DVD to be played on your player - this is your problem:
E 13:28:31 Fix VTS Sectors Failed! - Reason: Could not find VIDEO_TS.IFO
That file triggers the player to start the play - so without that one - no go.
In the folder you got from the creat


help?
in ImgBurn Support
Posted