cornholio7
-
Posts
3,054 -
Joined
-
Last visited
Content Type
Profiles
Forums
Events
Everything posted by cornholio7
-
google 'semaphore timeout' it is unfortunately a problem with some usb drives
-
 you can call me corny, and theres no hard feelings, if you dont like it thats up to you. you can't please everyone all the time oh and about that drink... make it a coffee or cola and i'll join you
 -
i couldn't care less if the guy likes it or not , neither does he anymore as he has disabled it
-
especially when 1x isn't supported by the media *cough*
-
imgburn can't lock drive for exclusive access
cornholio7 replied to photo_angel2004's topic in ImgBurn Support
if it happens again then run sys internals and find out what is hogging your drive -
that is already in settings
-
you shouldnt be guided so much by what it says on the box, look for the MID /manufacturer ID.take a look here http://forum.imgburn.com/index.php?showforum=15 to see what i mean. the first one in the list is Bulkpak 2.4x DVD+R DL [CMC MAG-D01-00] .the box will say bulkpak but the mid is CMC MAG-D01-00
-
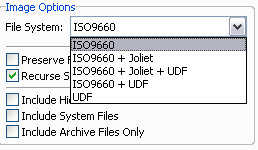
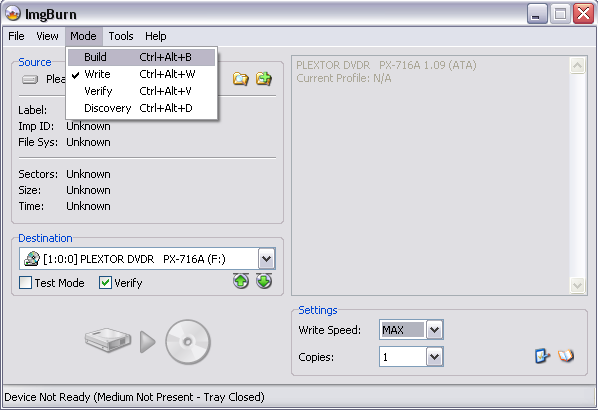
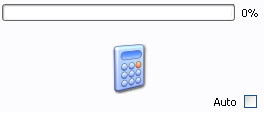
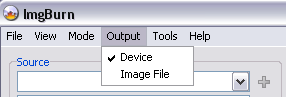
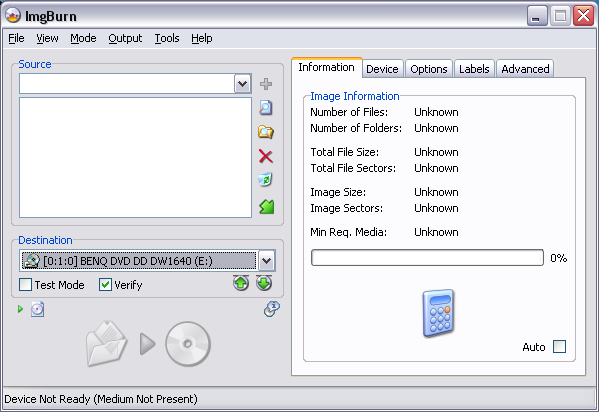
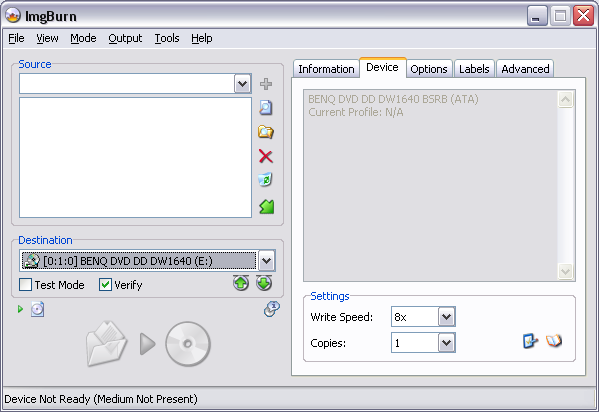
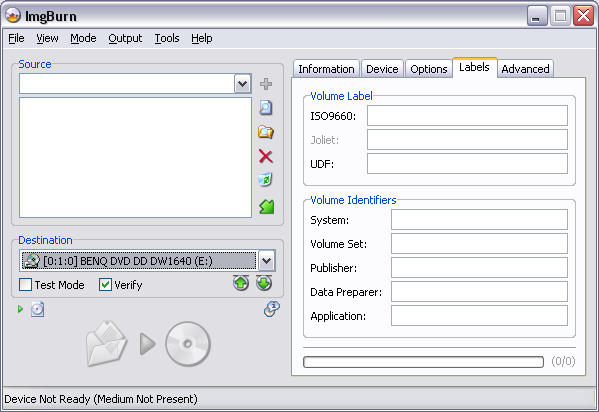
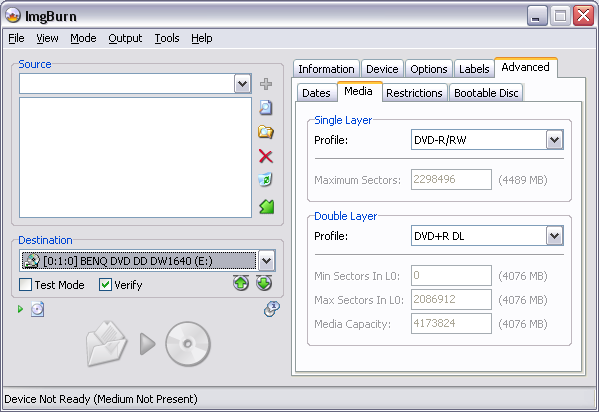
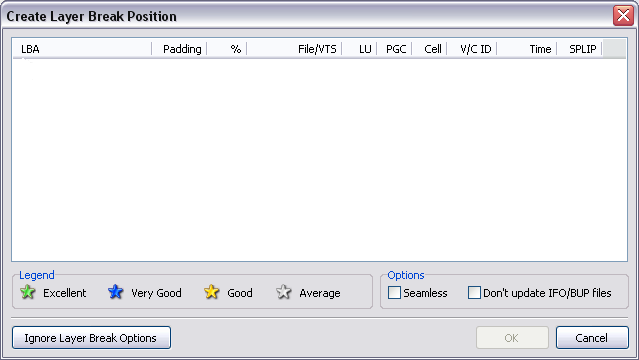
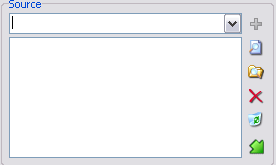
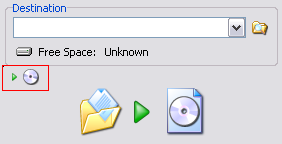
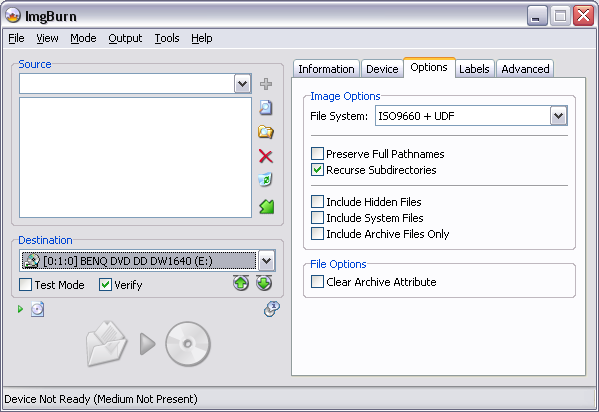
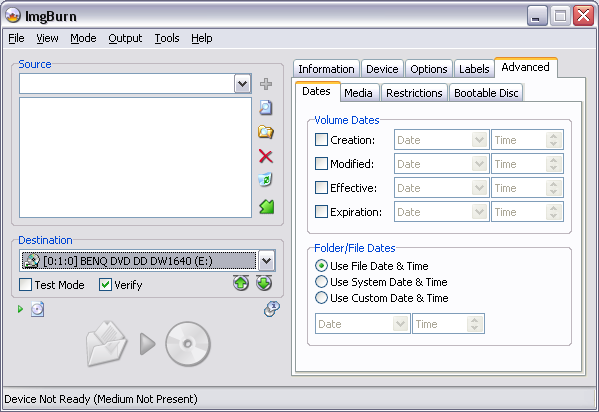
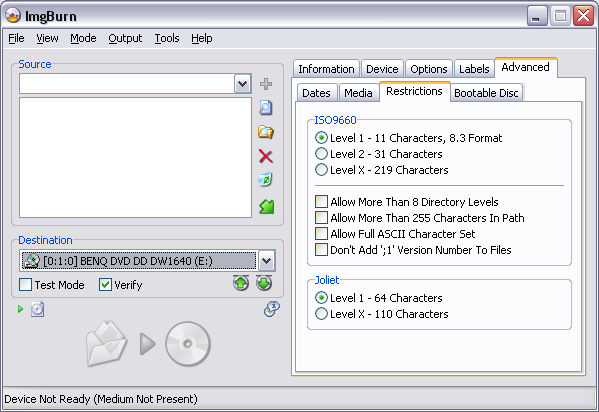
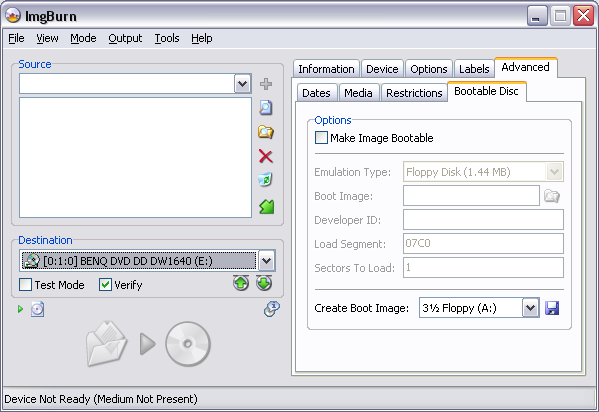
Open ImgBurn and choose Mode -> Build, or use the Ctrl+Alt+B option. This opens Build Mode and you will see this screen. From here, you can add/remove files or folders to your ISO. You can choose to type the folder location in the drop down box, or browse for files/folders via the icons on the right. By pressing the disc icon, highlighted in the red box, you can choose the Output mode to save your ISO. This Output mode is save to hard disc. You need to choose a destination folder on one of your hard discs. This Output mode is save to CD/DVD disc As you change between save to CD/DVD and Save to Hard Disc, the Device tab is no longer shown on the GUI. You can choose to change the Output at the top of the GUI if you prefer . As you add files/folders, you can check the size of the ISO by pressing the Calculator. It will indicate the size of the disc you need as you build. Check the 'Auto' checkbox and this will be done automatically as you add files/folders to the list. The Device tab is not shown in save to Hard Disc Output mode From the Options tab you can choose the file system you wish to use. Choose the file system you wish to use from the dropdown. ISO9660 is the original one that's been around for years and has quite limited functionality. For Example: You're limited to 8.3 characters for a file name (i.e. SOMEDOCU.TXT) You're limited to all uppercase file names. You're limited to file less than 4GB in size. Joliet is an extension of ISO9660 and allows for longer / mixed case file names. The file size limit still applies. For Joliet to be used, ISO9660 must also be present - this is reflected in the options available. UDF is a file system in it's own right and does not depend on another one also being present. UDF supports long / mixed case file names and does NOT have the 4GB file size limit of Joliet and ISO9660. It is the 'better' option for those people using up-to-date operating system. I say 'up-to-date' because older ones like Windows 95 and 98 cannot read / understand the UDF file system and will probably report the disc as being corrupt if that's the only one on it. Standalone DVD players are only supposed to (made to) understand UDF. Being able to read ISO9660 / Joliet is optional. As such, if you're building a DVD Video disc, you at least want to make sure the UDF filesystem is present in any image you're building / burning. A typical DVD Video disc you buy from a shop will use 'ISO9660 + UDF', so to be totally correct, that's what you should use too. That way, a standalone player can read it (due to UDF) and PC's with old operating systems can read it (due to ISO9660). A new operating system can read both but will favour UDF because it's more advanced. Create Layer Break Position If you are using ImgBurn's Build Mode to make Double Layer DVD Video discs, during the build you will see this window. There is a rating system at the bottom which indicates the best Layer Break choice. Where you have multiple options showing the same LBA address, these just represent Cells that are reused in various PGC's. It's quite possible for each of these entries to be given a different rating, so you may have to think a little bit and average the options out. i.e. if you have a single 'Very Good' entry and then 5 with the same LBA where 1 is ranked as 'Excellent' and the other 4 are 'Average', go for the 'Very Good' entry on its own. From the Labels tab you can give your iso the name you want it to have. Volume Identifiers These fields are used to fill out certain structures within the filesystem. Their content is almost never seen and what you put in them has no real effect on anything. Typically you'd just leave them blank. The progress bar is updated so that it represents the number of characters you've typed in, and how many the field actually allows for. The text colour changes from green to orange to red as you start to run out of available characters. Advanced: Dates Here you can adjust / override the dates and time associated with files and folders. You can also set the dates / times associated with the image as a whole. If no date / time is specified, it will typically use the current system time - unless otherwise specified - i.e. where it says it'll use the existing file time. The dates and times of files are what you see in explorer when you look at the created / modified dates and times. To override the default values, just check (tick) the checkbox, select the date from the calendar control and the time from the time control (you need to actually type numbers into that one). Media This applies to those people building to an ISO image rather than burning on the fly to a disc. When burning to a disc, these values are retrieved from the media in the drive and certain assumptions are made based upon it's format (i.e. double layer or single layer, dvd+r or dvd-r etc). When you're building an ISO image, the program needs to know the maximum amount of data (sectors) you want in the image before the program should consider it a 'double layer' image and start looking for layer breaks and stuff (* if it's a DVD Video style image). The profiles can be used to take a standard value for either DVD-R or DVD+R format media. If you want to enter your own value (i.e. if you like to overburn), select Custom and type it in manually. When the amount of data in your image exceeds the 'Single Layer - Maximum Sectors' value, the 'Double Layer' values come into play. You need to ensure the correct profile is (or custom values are) selected here so that your image is built correctly for the discs you intend to burn to. Restrictions All file systems have their limitations. Sometimes these can be 'tweaked' slightly to suit your needs. The 'Level X' values are where allowable lengths are taken to the extreme and represent the maximum values possible. There is no guarantee the images produced using 'Level X' relaxed restrictions will be readable. 'Allow Full ASCII Character Set' can be used to override the ISO9660 limitation of only allowing 'A...Z', '0...9' and '_' characters in file names. 'Don't Add ';1' Version Number To Files' can be used to ImgBurn to go against the ISO9660 specifications and not append ';1' to the end of all file names. I honestly have no idea where this would be useful, but other burning tools include the option and so I'll just go along with them! Bootable Disc: Make Image Bootable can be checked if you want to make a bootable image. That's to say, one that you can have boot up in the same fashion a bootable floppy disc does, before the operating system kicks in. This type of feature is typically seen on recovery discs and will often be used by those people who choose not to have a floppy drive installed in their new PC. Once enabled, select the emulation type for the boot image you've already prepared. So for example, if you've created your image by reading a bootable floppy disc, you'd probably select '1.44Mb Floppy Disc'. You then point 'Boot Image' at your bootable image file. (This can be created via the method explained below). 'Create Boot Image' can be used to read a bootable floppy disc to an image, or extract an existing boot image from a bootable CD. You just need to select the source drive and then click on the picture of the floppy disc. It'll ask you for a name for the image and then start creating it. It's is this type of image that the above mentioned 'Boot Image' option would point to.


-
Invalid Field in CDB prevents writing ISO image
cornholio7 replied to javaguy's topic in ImgBurn Support
try updating your firmware to GD30 here http://forum.rpc1.org/dl_firmware.php?download_id=1978 you should be using only Verbatim discs for dual layer , CMC discs arent that good if you know how to do it you could always try cross flashing the drive to the BenQ DW1620 it really is -
are you trying to burn vob files or an iso file?
-
all the best mate, have a great day from me and Jill
-
imgburn won't replace decrypter , it will install as a separate programme and you don't have to uninstall dvddec
-
are you outputting shrink to an iso? what is the MID of your discs? can you post an imgburn log please
-
may as well say it twice kev
-
if it did the same in power dvd from the hdd iso then it would have probably meant the image was corrupt
-
does the same thing happen if you mount the iso in daemon tools and watch it with power dvd?
-
happy birthday from me and jill again mate
-
hello 4400 and welcome to the forum what we need to see is a log. if you havent saved it then can you open the programme, put a blank in and copy and paste the info from the right hand side of the gui in your next reply like this BENQ DVD DD DW1640 BSOB (ATA) Current Profile: DVD-R Disc Information: Status: Empty Erasable: No Free Sectors: 2.298.496 Free Space: 4.707.319.808 bytes Free Time: 510:48:46 (MM:SS:FF) Supported Write Speeds: 2,4x; 4x; 8x Pre-recorded Information: Manufacturer ID: TYG02 Physical Format Information (Last Recorded): Book Type: DVD-R Part Version: 5 Disc Size: 120mm Maximum Read Rate: Not Specified Number of Layers: 1 Track Path: Parallel Track Path (PTP) Linear Density: 0.267 um/bit Track Density: 0.74 um/track First Physical Sector of Data Area: 196.608 Last Physical Sector of Data Area: 0 Last Physical Sector in Layer 0: 0
-
or i just did
-
i think lfc excused himself on the way out
-
no , thats the one i meant
-
How do you change the booktype to DVD-ROM
cornholio7 replied to ElBoricua433's topic in ImgBurn Support
+r , you cant change -r -
thought it was you , just need your ever changing face avatar now
-
How do you change the booktype to DVD-ROM
cornholio7 replied to ElBoricua433's topic in ImgBurn Support
-
How do you change the booktype to DVD-ROM
cornholio7 replied to ElBoricua433's topic in ImgBurn Support
once you set it in imgburn it will remember the setting unless your drive is an LG which resets itself after every reboot