

LIGHTNING UK!
-
Posts
30,521 -
Joined
-
Last visited
Content Type
Profiles
Forums
Events
Everything posted by LIGHTNING UK!
-
You don't need to remove anything and it won't change the actual video. You're just inserting a marker in one of the IFO files. It's these markers that have to be aligned correctly at the layer break position. You could try burning the disc as it is but some players are picky and it'll just stop dead at the layer change position and you'll never get to see the 2nd half. As with most software tools, if you search on Google, you're bound to find a guide on how to split/insert some cells. You can bet your life you're not the first person to have asked questions about doing it, so just search and see what it finds!
-
lol 0.7x speed! Welcome to the world of continual buffer underruns! You need to ditch the monitor usb connections and see if you have proper USB 2.0 ones in your PC anywhere. If you don't, you should invest in a USB 2.0 PCI card or something.
-
You should insert some cells/chapters (split existing ones) around the midway point so it can find a decent spot for a layerbreak. You can use VobBlanker for that. Update ImgBurn too.
-
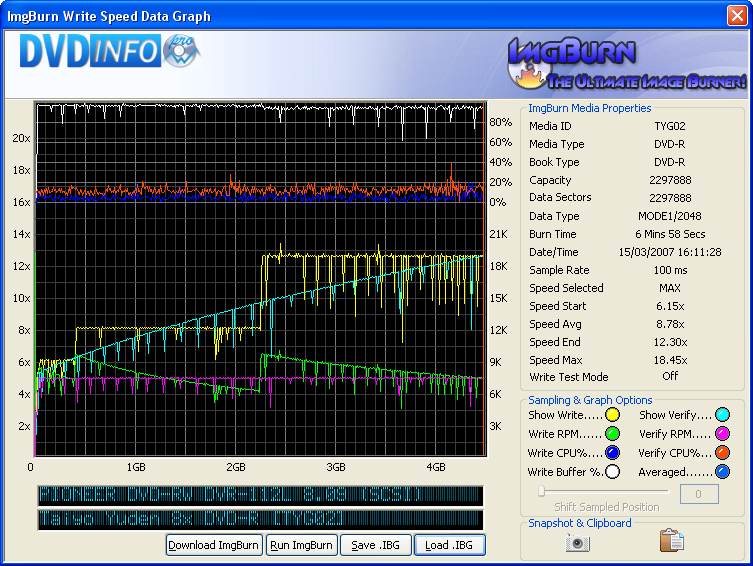
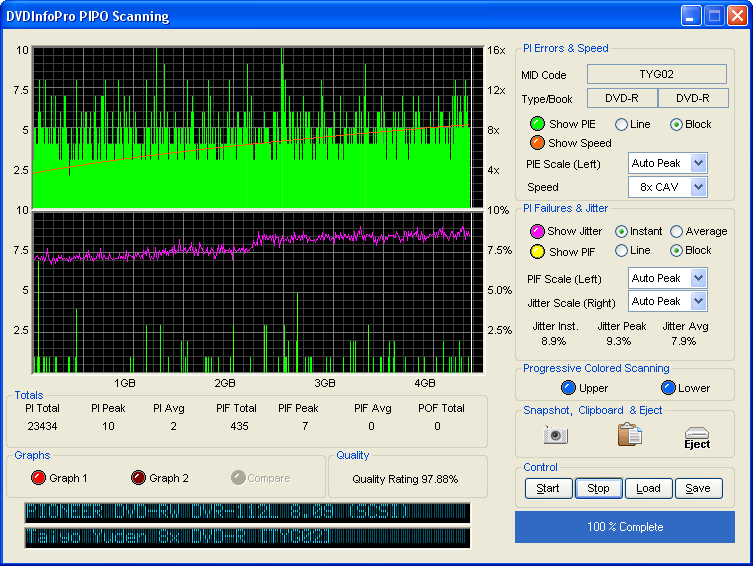
PIONEER DVD-RW DVR-112L 8.09 (SCSI) Media Information: PIONEER DVD-RW DVR-112L 8.09 (SCSI) Current Profile: DVD-R Disc Information: Status: Empty Erasable: No Free Sectors: 2,297,888 Free Space: 4,706,074,624 bytes Free Time: 510:40:38 (MM:SS:FF) Supported Write Speeds: 4x, 6x, 8x, 12x Pre-recorded Information: Manufacturer ID: TYG02 Recording Management Area Information: PIONEER DVD-RW DVR-112L Physical Format Information (Last Recorded): Book Type: DVD-R Part Version: 5 Disc Size: 120mm Maximum Read Rate: Not Specified Number of Layers: 1 Track Path: Parallel Track Path (PTP) Linear Density: 0.267 um/bit Track Density: 0.74 um/track First Physical Sector of Data Area: 196,608 Last Physical Sector of Data Area: 0 Last Physical Sector in Layer 0: 0 Results: I 16:11:25 ImgBurn Version 2.2.0.3 Beta started! I 16:11:25 Microsoft Windows Server 2003, Standard Edition (5.2, Build 3790 : Service Pack 1) I 16:11:25 Total Physical Memory: 2,094,396 KB - Available: 695,660 KB I 16:11:25 Initialising SPTI... I 16:11:25 Searching for SCSI / ATAPI devices... I 16:11:25 Found 2 DVD-ROMs, 2 DVD?RWs and 4 DVD?RW/RAMs! I 16:11:28 Operation Started! I 16:11:28 Source File: -==/\/[DISCOVERY IMAGE]\/\==- I 16:11:28 Source File Sectors: 2,297,888 (MODE1/2048) I 16:11:28 Source File Size: 4,706,074,624 bytes I 16:11:28 Source File Volume Identifier: DISCOVERY_IMAGE I 16:11:28 Source File File System(s): None I 16:11:28 Destination Device: [4:1:0] PIONEER DVD-RW DVR-112L 8.09 (I:) (SCSI) I 16:11:28 Destination Media Type: DVD-R (Disc ID: TYG02) (Speeds: 4x, 6x, 8x, 12x) I 16:11:28 Destination Media Sectors: 2,297,888 I 16:11:28 Write Mode: DVD I 16:11:28 Write Type: DAO I 16:11:28 Write Speed: MAX I 16:11:28 Link Size: Auto I 16:11:28 Test Mode: No I 16:11:28 BURN-Proof: Enabled I 16:11:28 Filling Buffer... (40 MB) I 16:11:28 Writing LeadIn... I 16:11:59 Writing Image... (LBA: 0 - 2297887) I 16:18:17 Synchronising Cache... I 16:18:27 Exporting Graph Data... I 16:18:27 Graph Data File: C:\IBG\PIONEER_DVD-RW_DVR-112L_8.09_15-MARCH-2007_16-11_TYG02_MAX.ibg I 16:18:27 Export Successfully Completed! I 16:18:27 Operation Successfully Completed! - Duration: 00:06:58 I 16:18:27 Average Write Rate: 12,158 KB/s (8.8x) - Maximum Write Rate: 17,407 KB/s (12.6x) I 16:18:27 Cycling Tray before Verify... I 16:18:49 Device Ready! I 16:18:49 Operation Started! I 16:18:49 Source Device: [4:1:0] PIONEER DVD-RW DVR-112L 8.09 (I:) (SCSI) I 16:18:49 Source Media Type: DVD-R (Book Type: DVD-R) (Disc ID: TYG02) (Speeds: 4x, 6x, 8x, 12x) I 16:18:49 Image File: -==/\/[DISCOVERY IMAGE]\/\==- I 16:18:49 Image File Sectors: 2,297,888 (MODE1/2048) I 16:18:49 Image File Size: 4,706,074,624 bytes I 16:18:49 Image File Volume Identifier: DISCOVERY_IMAGE I 16:18:49 Image File File System(s): None I 16:18:49 Verifying Sectors... (LBA: 0 - 2297887) I 16:25:23 Exporting Graph Data... I 16:25:23 Graph Data File: C:\IBG\PIONEER_DVD-RW_DVR-112L_8.09_15-MARCH-2007_16-11_TYG02_MAX.ibg I 16:25:23 Export Successfully Completed! I 16:25:23 Operation Successfully Completed! - Duration: 00:06:33 I 16:25:23 Average Verify Rate: 11,694 KB/s (8.4x) - Maximum Verify Rate: 17,329 KB/s (12.5x) Scans: BENQ DVD LS DW1655 BCIB LITE-ON DVDRW LH-20A1H LL07

-
Firmware - http://www.plextor.be/download/ftp1/740A102.exe As for the discs, I dunno, you'll have to just checkout some online places that deliver to wherever you live. Here in the UK, I use www.svp.co.uk New version of ImgBurn - http://www.imgburn.com
-
Have you tried burning at the rated speed (16x) rather than 2x/4x? We've seen lots of issues with those sony discs lately... something tells me they're not very good at all. Check your firmware is up-to-date and get some Verbatim (MCC dye) or Taiyo Yuden discs instead.
-
If you've already got a source CD, what the hell are you playing around with Build mode for?! Just read it and write it. Just leave ALL the settings on their default values. You don't need to change / mess around with anything.
-
Your drive probably doesn't support those discs. Eject + reinsert it. The drive may recognise it properly after a second try. This is nothing to do with the program, so to speak.
-
I believe the flasher is a windows one. Why not just try it and see what happens?!
-
scuzzy, this thread is about Verbatim double layer discs, not single layer ones. 16x doesn't even come into the equation just yet! What I'm saying is that I prefer the 2.4x DL media (MKM-001-00) to the 8x DL media (MKM-003-00).
-
If yours work, don't mess with them. If any updates were ever REALLY needed, I'm sure they'd make it onto Windows Update.
-
You can get TS07 (and all the other versions) from http://forum.rpc1.org/dl_firmware.php?download_id=2229 You need the firmware file and also the flasher. The flasher should still find the drive even though it's external. Don't use anything other than Verbatim +R DL's. It doesn't matter what you're putting on it, the other are just useless in comparison.
-
The ISO file association checkbox is not enough on it's own. All that does is add an entry to the context menu when you right click on an ISO file that says 'Burn using ImgBurn'. To get the icon to change, ImgBurn must be the default app (via the 'Set ImgBurn As Default Application' checkbox in the ImgBurn settins), whereby double clicking on the ISO file will then launch ImgBurn. Of course if your HKCR\.ISO registry key is screwed up, this might not work.
-
If you're using 2.2.0.0 and haven't already disabled it, your +R DL media will automatically have the booktype changed to DVDROM. There's no reason NOT to do it, so you might as well just do it all the time. No you don't need to make an ISO first, just use Build mode. Add your folders / file and set 'Output' to 'Device'. It's all detailed in the Guides section, just ignore any step that's specific to DVD Video. (i.e. layer break selection screens etc) The basic principals are the same.
-
Unless the default application for .ISO file is changed to something else, they might well still be shown with the winrar icon. If you have 'ISO' checked and 'Set ImgBurn As Default Application' checked within the ImgBurn settings, the ISO files will then get a nice ImgBurn icon instead. (You have to close the program for the changes to take effect) 'Build' mode also creates ISO files but it's making a totally new image / filesystem based on the files/folders you've selected - and there are LOADS of options associated with all that - hence why it's more complicated. When you use 'Read' mode, the entire disc is read sector by sector so you get a 1:1 copy. Yes, of course you can! I was simply showing you how easy 'Read' mode *could* be if you accepted the default destination file etc - i.e. it's pretty much 1 click.
-
Sunbeam, you're making this sound far more difficult / complex than it actually is! As dontasciime just said, the simplest (and I guess, most correct) method of creating an ISO from an existing disc is to use 'Read' mode. It's not rocket science, you just put the disc in the drive and click the 'Read' button! The 'Destination' file path+name is automatically generated so you don't even have to do that! Just read where the program is putting the file and that's all you need to know.
-
You're kidding me, right? Have you ever looked in a .dvd file? Open one up in notepad and see what it says. On the other hand, you should stop downloading them. It's illegal.
-
With regards to the LB, you should NEVER EVER EVER EVER EVER (get the idea?) leave it on 'User Specified'. That's supposed to be a 1 time only setting for advanced users that need it on something specific for a SINGLE burn. The value in the .DVD/.MDS is only used if the program is set to 'Calculate Optimal'. I noticed a lot of people were messing up because they had played with the settings and so 2.2.0.0 actually tried to prevent that by pointing out that the 'custom' value and .dvd/.mds value (if specified) were different, if indeed they were. Forcing people to set specific options they don't understand only causes them problems later on when they try to burn different image, so please, try to teach them to leave it on 'calculate optimal' and just rely on the .DVD/.MDS file instead.
-
Shaun! Post up the minidump again and I'll examine it.
-
I dun wanna finalize my CD/DVD..how??
LIGHTNING UK! replied to deejay220989's topic in ImgBurn Support
Oops, I appear to have missed that line from the changelog! That option simply tells the program to issue the 'finalise disc' command with / without the 'min. radius' (about 1GB of data) flag. So basically, if you burn less than 1GB, the drive pads to 1GB to make it more compatible in readers (or it doesn't if it's disabled!) -
I personally prefer the 2.4x rated verbs over the 8x ones. 8x ones seem to need newer firmware etc to work properly.
-
The easiest way to get your answer is to try it and see! The original LB is typically going to be marked with 'SPLIP' = false. Just look at the stars and do some previewing, that's what they're there for.
-
Sorry, I've no experience with optical drives on 3rd party SATA controllers. http://club.cdfreaks.com/ might be able to help you.
-
verify data using a different drive
LIGHTNING UK! replied to frankiec's topic in ImgBurn Suggestions
frankiec, you can already do exactly that. Ok so it's not automated, but I really don't think it needs to be. If you want to do something out of the 'norm', it should be down to the user to do it. Untick the normal verify option, burn, switch to verify mode, load the same image from the 'MRU' list and then verify in the drive of your choice. As a side note, and to clear up any misunderstanding, when you verify as part of the 'Build' (i.e. when burning on-the-fly), it DOES verify against the virtual image file again (because all the info required is still available in memory from the burn). -
Don't Prompt VIDEO_TS Content Answer No does not work
LIGHTNING UK! replied to Defenestration's topic in ImgBurn Bugs
Thanks, it wasn't actually checking the 'answer' at all, just if the 'don't prompt' option was checked (probably because I added the yes/no answers at a later date without actually really planning to). Fixed now.


