-
Posts
30,514 -
Joined
-
Last visited
Content Type
Profiles
Forums
Events
Everything posted by LIGHTNING UK!
-
Are the discs brand new? Have you checked for a firmware update for the drive? I guess it just doesn't like them at the moment. The brand name on them doesn't really mean anything, they could have switched dyes without you knowing and the new one could be one your drive doesn't like.
-
The drive might well be failing at the end as it tries to close the disc, but the data still seems to be ok because the verify completed successfully. I'm not really sure how to 'help' you, it's just a case of your drive failing to do what's asked of it. That could be down to the media or just that the drive has started to wear out. As you say, that model is a couple of years old now and these things don't last forever.
-
donta, internals and externals often share the same ID string so you can't just go by that - incase you were?
-
The drive/enclosure/drivers are forcefully terminating the command - long before it/they should be. I guess it's then not recovering properly and hence that's why the next command isn't being processed and why ImgBurn then appears to hang. The "The semaphore timeout period has expired" error is all too common on USB drives but nobody really knows why they happen. If you can avoid using USB, do so. If you really are only using USB 1.0, you'd do well to buy a decent USB 2.0 card and plug the drive into that instead. You can't even burn DVD's at 1x over USB 1.0.
-
The only problems are these: There's just something the drive doesn't like about the discs. Get another spindle of Verbatims (maybe the +R type this time) or start thinking about getting a new drive.
-
Press F8 just before you press the 'Write' button. It'll put some more info in the log and then perhaps we can tell exactly which command your drive is having trouble processing. I would guess that the 3 hour wait is it timing out and then going onto the next command - which it does like and is processing instantly.
-
If it was an ISO and you burnt it as an ISO (i.e. using Write mode), ImgBurn is nothing to do with it. The bootable info is just part of the ISO file, it's not anything ImgBurn has to do and as such, burning a bootable ISO is exactly the same as burning *ANY* image file. Burn it and verify it. If that all goes ok, you have to look elsewhere for the issue.
-
Happy Birthday Blu
-
Oops, I'm not actually sure I was ever supposed to be blocking ';' in the first place! I've removed it from the 'UnacceptableCharacters' list, ready for the next version.
-
A 1:1 copy is exactly that. If I go converting the format, the whole point of it goes out the window. I actually find it very hard to believe any decent program would read a disc to an image and change it from what it was supposed to be.
-
Probably file system limitations. i.e. FAT32 won't support files > 4GB in size.
-
Yeah, Intel were far too quick to get rid of IDE. Fair enough people haven't really used IDE for HDDs in a while, but SATA optical drives are still pretty rare and never seem to work as well as PATA ones. That's one of the reasons I went for the 975 chipset rather than 965. That way, even if my new SI680 or ITE8212 cards didn't work properly, I'd at least be able to run 2 drives. As it turns out, I can now have 6 in my PC at the same time! Makes my life much easier
-
OMG, what the hell are all those?! remove the following: Lower Class Filter: Tetris Lower Class Filter: sscdbhk5 Lower Class Filter: Pfc Lower Class Filter: drvmcdb Lower Class Filter: iomdisk Lower Device Filter: imapi A few of the others look old, you should update the software they go with.
-
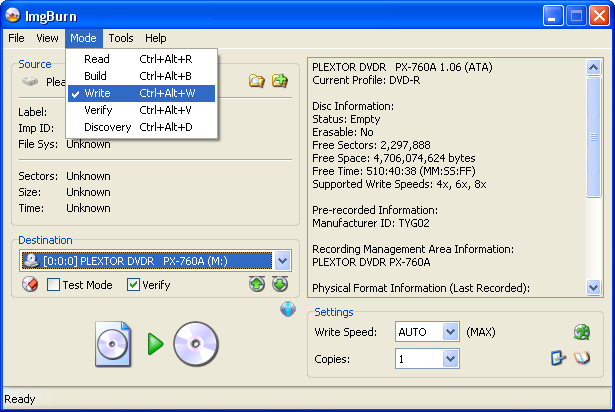
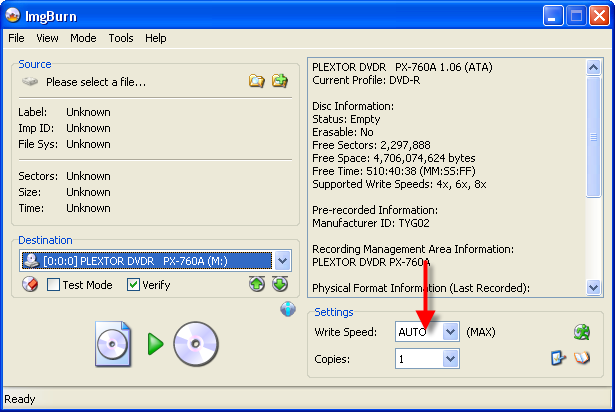
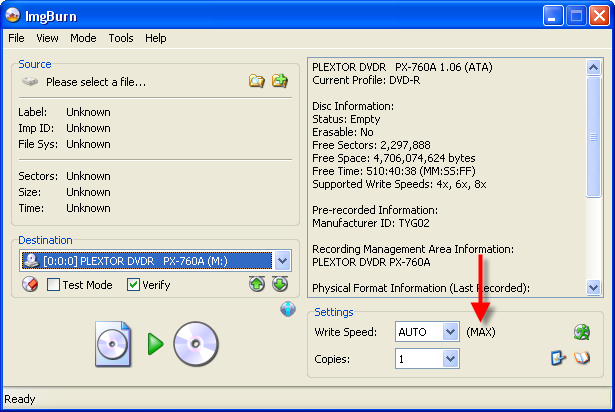
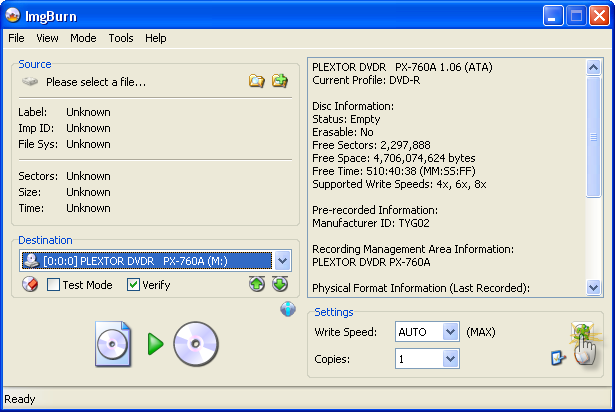
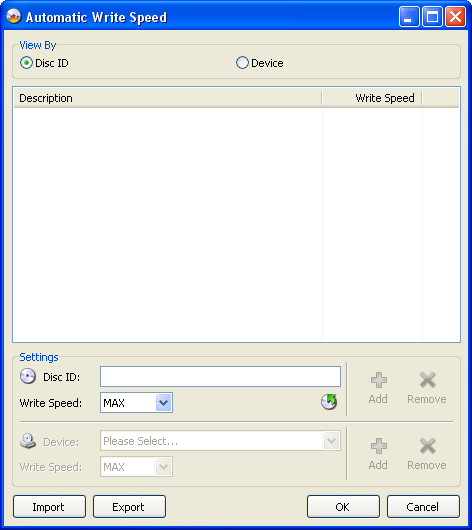
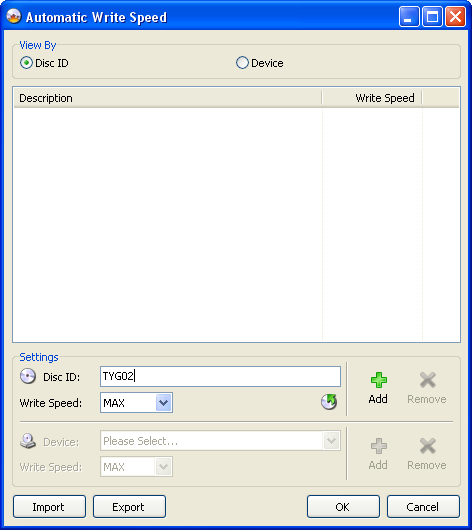
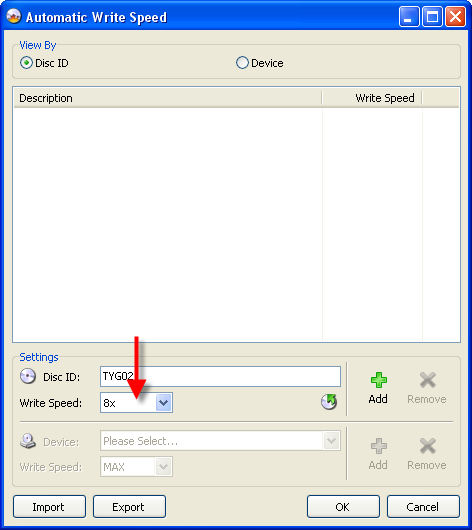
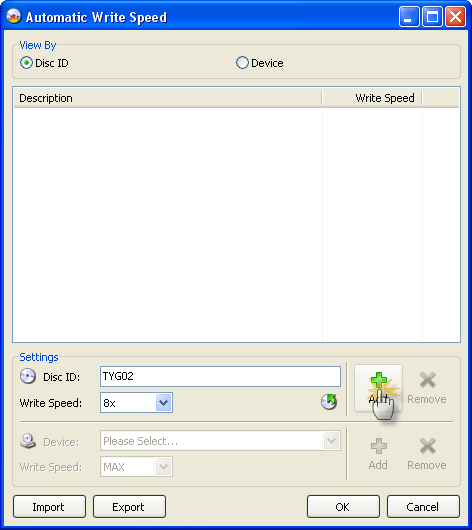
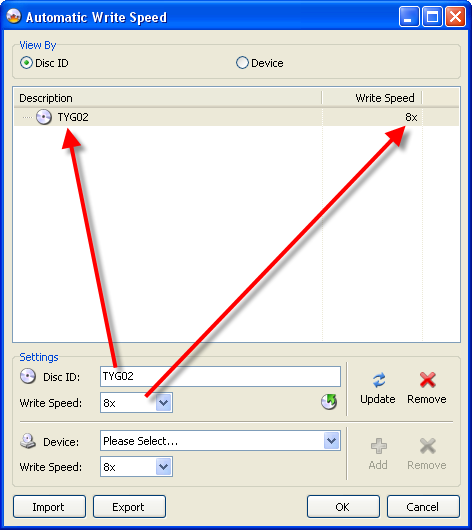
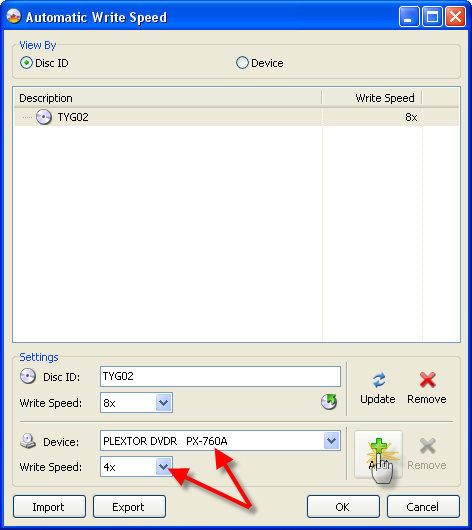
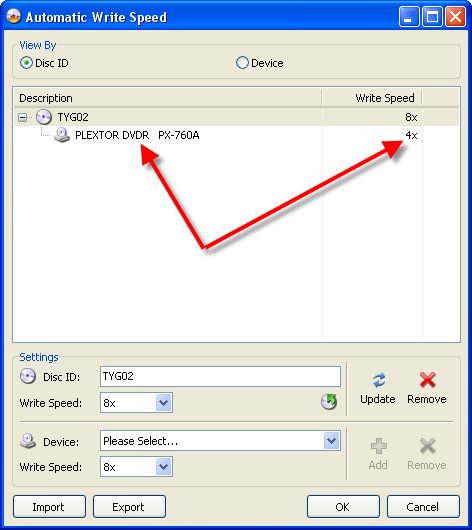
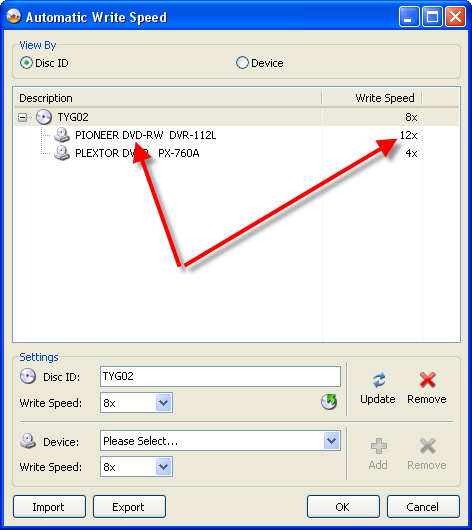
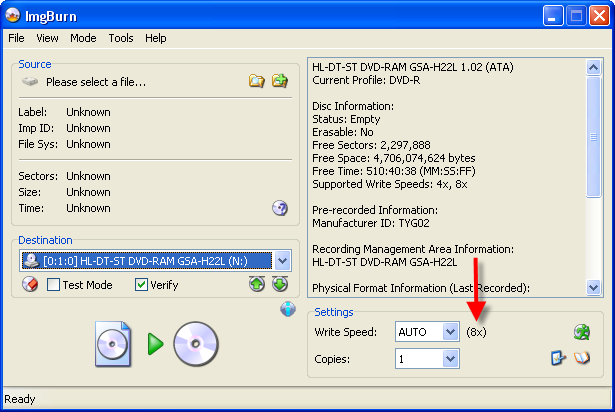
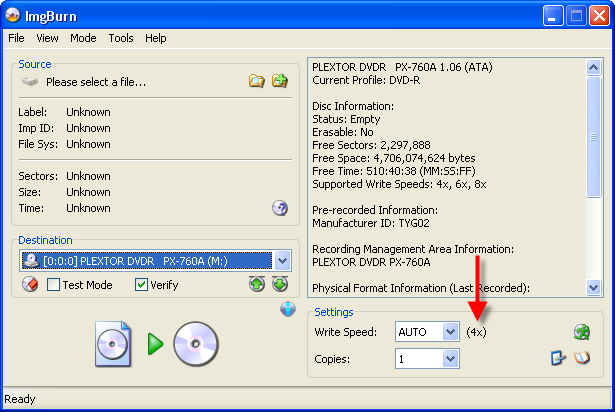
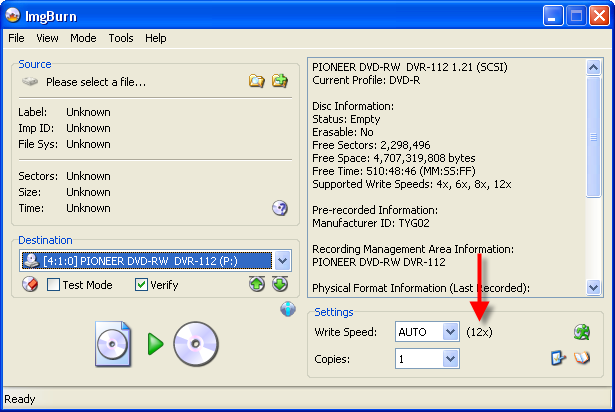
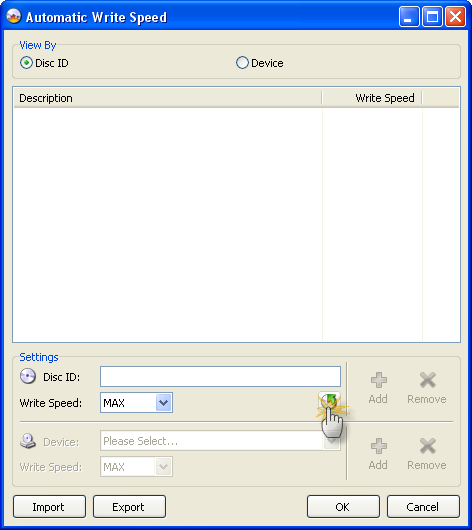
Hello and welcome to another of my legendary guides *cough* In this one I'll be explaining how to use the new 'Automatic Write Speed' feature found in versions 2.2.0.0 onwards. For those of you that don't know, the 'Automatic Write Speed' feature basically lets you configure a set of predefined write speeds for any given type / brand of media and the program will automatically use those speeds every time you burn that type of disc, without you ever having to change anything. So when you switch between your good discs and your bad discs, or your single layer discs and your double layer discs, you don't have to worry about them burning at the wrong speed. Neat huh? =========================================================================== Right, so obviously the first thing we need to do is load ImgBurn. I'm going to assume you at least know how to do that! Once it's loaded, for the sake of keeping things simple, switch to 'Write' mode. You do that by clicking on the 'Mode' button in the menu at the top and then selecting 'Write', as shown in the picture below. When you've done that, your screen should hopefully look something like this: If you look at the red arrow in the picture above, you'll see it's pointing to the 'Write Speed' drop down box. Notice how the box currently has the word 'AWS' in it? Well, that means the 'Automatic Write Speed' feature is active and will be used whenever you burn a disc! If the box doesn't say 'AWS', it won't be! The picture below points out some text to the right of the 'Write Speed' drop down box. Whatever it says there is the actual write speed that's going to be used - based on your current drive selection and the media in it. If there's nothing specifically configured for either of those (or there's no disc in the drive), it'll just show '(MAX)' - meaning the disc will be burnt at maximum speed. Ok, so that covers how to turn the feature on and off ('AWS' = On, Anything else = Off), now lets actually look at how we configure everything... To start, click the little button as shown below. For those of you that can't work out what that picture is, it's a little green stick man running over a disc! Whoooosh! When you've done that, you should see a screen like the one below... Welcome to the 'Automatic Write Speed' configuration screen! Right, ok, the first thing you need to remember is that this feature sets the write speed based on the media you're burning to. If you didn't already know, every different brand / type of disc (well, DVDs anyway) has its own unique code. If you've ever looked around at any forum postings, you may have noticed the terms 'Manufacturer ID' (MID) and 'Disc ID' being used. These are the unique codes of the disc that allow us to tell who made then (or rather who made the dye used on them) and what speed they're designed for, be it 4x, 8x, 16x etc. Some of the 'better' discs are known to use the following MID's: 'MCC 02RG20' - Verbatim 8x DVD-R Media 'MCC 03RG20' - Verbatim 16x DVD-R Media 'MCC-003-00' - Verbatim 8x DVD+R Media 'MCC-004-00' - Verbatim 16x DVD+R Media 'TYG02' - Taiyo Yuden 8x DVD-R Media 'TYG03' - Taiyo Yuden 16 DVD-R Media 'YUDEN000-T02' - Taiyo Yuden 8x DVD+R Media 'YUDEN000-T03' - Taiyo Yuden 16x DVD+R Media For the purposes of this guide, I'm just going to create an entry for discs using the TYG02 dye (they're my favourite ). So I start by typing 'TYG02' into the 'Disc ID' field as shown below. (*Read the text below for an alternative method!) Please Note: If there's a disc in the drive, the 'Disc ID' field may have already been filled out when you first opened the AWS settings screen. This is because the program automatically populates it with the 'Disc ID' of the media currently in the drive. You can also click on the little button (as shown below) to manually achieve the same effect (i.e. Read the Disc ID from the current disc and copy it to that 'Disc ID' field). This can come in handy when creating several profiles in one go. Before I can move onto the next bit, you need to understand that the write speed used by the AWS feature depends on 2 things. 1. Is there a specific write speed setting (profile) for this media? 2. If number 1 is true, is there a specific write speed setting (profile) for this drive, based on this media? (This will become clearer in a minute!) The screen below shows me changing the 'default' write speed for the media to 8x. This value will be used if there isn't a (more) specific one configured for the drive. I'm using 8x because I know the 'TYG02' dye is just about the best you can get and that I will get good quality burns at that speed. When you've chosen your write speed, click the 'Add' button as shown below. As if by magic, a new entry will appear in the list! Ok, now let's say you've got a few drives in your PC and you want to limit one of them to 4x on that media. Change the 'Device' drop down box so it says the drive you want it to and then change the speed for that drive to say 4x. When you've done that, click the 'Add' button as shown below. (Notice it's not the same one you clicked earlier!) Now you'll see there's a new 'Device' sub-entry under 'TYG02' and it lists '4x' by the side of it in the 'Write Speed' column. Great work, give yourself a pat on the back! In the screen below you can see I've added another entry so my Pioneer DVR-112L will burn them at 12x. (Although this is only 8x media, the Pioneer can 'overspeed' them and burn at 12x). Click on the 'OK' button when you're done. (otherwise it won't save the settings!) Now, whenever I insert a TYG02 disc, the program will examine that table to see if an entry for 'TYG02' exists (which it does!). It'll then search the sub-entries of 'TYG02' to see if there's one for the current drive. If there is, it'll use the drive's write speed setting (4x in the case of the Plextor, 12x in the case of the Pioneer). If there's not, it'll use the media one (8x). Here you can see it in action... First lets start with a drive that's NOT specified under the 'TYG02' entry. Notice how the speed no longer says 'MAX', but instead lists '8x', because that's what we selected as the media's default write speed. Now we see the Plextor drive has correctly picked up it's (drive specific) '4x' write speed setting. And finally, the Pioneer drive with it's (drive specific) '12x' write speed settings. Right, that's about it for this guide! Hopefully you get the idea and have been inspired to now go through all the discs you use, creating little 'profiles' for each one. When you're done, it might be an idea to 'Export' your AWS settings to a file and keep it somewhere safe incase you ever want/need to 'Import' them again after a reinstall/rebuild. Good luck and happy burning!
-
Run the 'Tools' -> 'Filter Drive Load Order' thing and click clipboard - then paste it into a reply. You might have a driver in there that's messing things up. After than try a DMA reset as mentioned in the FAQ. That often sorts out a lot of problem. Maybe check your cables etc too.
-
Restarts and BSOD's are caused by drivers. You'd need to examine the memory dump (check c:\windows\minidumps) with something like windbg and find the cause. I've tested it on Vista (32 bit and 64 bit) and it seemed ok to me.
-
Are you sure it's not being changed? Look at the 'physical format information (last recorded)' in the info panel on the right. Obviously it only works with DVD+R format discs... you know that yeah?
-
It'll be reading as quickly as it possibly can. If the machine is bogged down or the network is, things will slow up. There are no settings to change, it should just work.
-
When it gets stuck, press F8 and see if the drive is still actually accepting commands. I've got that very same drive, with the same firmware and burnt a verbatim DL disc just yesterday. You might just have a faulty drive - or a duff batch of discs. Even though it might sit there for ages, you can probably reboot and chances are, the disc will be fine. If not, you can try to close it manually via the 'Close' options in the Tools -> Drive menu.
-
Sorry, I lied, 1.10 is for the 716. You just need the 1.06 version. On a gigabit lan you should be getting at least 20mb/s upwards (I get about 45mb/s I think). It does vary a little bit depending on the speed of your machine though. So if you max out at ~10mb/s, You can't be running 1gbit right to the desktops.
-
For the AWS thing, perhaps, as nobody seems to know what it is. For the rest, I doubt it.... Which other things are people unsure of?
-
Using dvd shrink instead of dual layer disks
LIGHTNING UK! replied to mattie711's topic in ImgBurn Support
Click 'Tools' -> 'Drive' -> 'Check for firmware update' Then see if it finds anything. Firmware is what makes your drive do the things it does - i.e. burn! It's like the operating system for your drive. You have to keep it up-to-date so it knows how to burn the media properly. Read the FAQ for DMA issues - I doubt you've got one as you're not complaining about burning at 2x all the time. -
The PX-760 firmware is up to v1.10 now isn't it? You should update it. Are you just burning 1 image at a time? Is the NAS box doing anything else whilst you're burning? Even a 100mbit network would manage 4x without a problem - possibly even 8x. So for a 1gbit network to be that slow, something else must be bogging it down.
-
Using dvd shrink instead of dual layer disks
LIGHTNING UK! replied to mattie711's topic in ImgBurn Support
If they skip at the end, it's probably due to your player not being able to read the disc. It's quite common that lower quality media causes skipping towards the end of the disc - if not the entire time! If you're already using good media (which you say you are), try slowing the burn down. Are you sure those verbatims are MCC dye and not one of the cheaper ones? Is your drives firmware up-to-date? Are you able to do any disc quality / pipo scanning with your drive? It would help if it did, because then we can see what the burn quality is like.