Cynthia
-
Posts
6,588 -
Joined
-
Last visited
Content Type
Profiles
Forums
Events
Everything posted by Cynthia
-
I would do this: Decide which media codes you are going to burn with and then look at scans posted in forums (CDFreaks and others), to see how well recent models can deal with those media codes. You can get pretty good results even with cheaper media if you pick the right burner. Don't know in which country you live - but the new Optiarc 7240 (released in the US so far) looks like a nice all-round burner.
-
I would stay away from Lite-On if you are burning +R media. I guess the four latest ones are Pioneer 116/216.
-
Dvd decrypter and Imgdurn both will not work.
Cynthia replied to Shane Blakely's topic in ImgBurn Support
Write Mode Main Menu -> Tools -> Drive -> Capabilities -
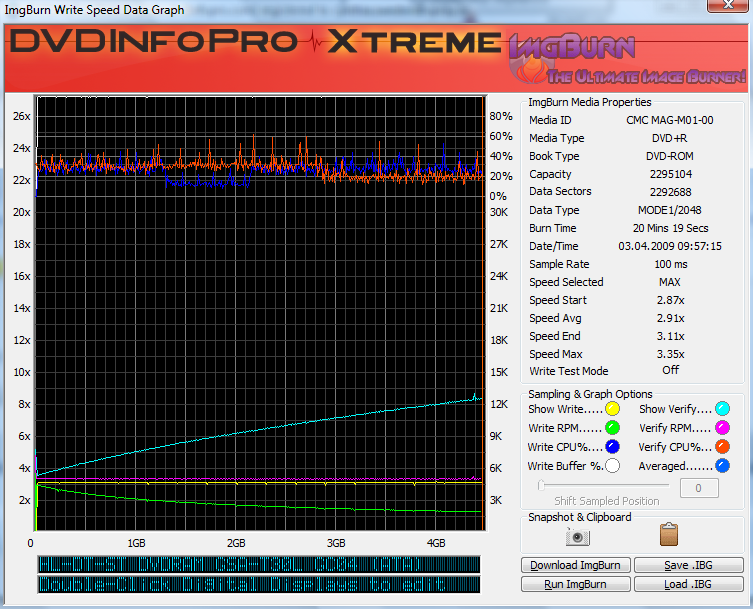
Max writing speed setting not working for me in new Version
Cynthia replied to casketizer's topic in ImgBurn Support

-
Determine the OEM of my HL-DT-STCD-RW GCE-8481B;C102
Cynthia replied to leoliver's topic in ImgBurn Support
From what I can find out it's a genuine LG writer and not a rebadged one. There are no settings for LG burners in the advanced settings tab - so there is nothing to change for you in that section. -
In version 2.4.1.0 it was enabled by default. In version 2.4.2.0 and later ones - it's disabled by default.
-
Removes whole folder instead of just part built ISO
Cynthia replied to BenieUK's topic in ImgBurn Bugs
Running the same O/S as you. Test 1: Tried it with a folder named N:\test and placed 2 iso's in it and then built a third one to be saved into that folder and the after the delete of the incomplete third iso - the two first was still there. Test 2: The N:\test folder is empty when I start. After it asks you if you want to delete the not complete .iso file - it asks you this (if you use default settings):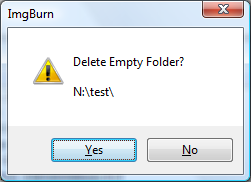
-
Max writing speed setting not working for me in new Version
Cynthia replied to casketizer's topic in ImgBurn Support
The issue must be very related to that drive as I can't reproduce it. -
Can't change to Drive (EEPROM!) on my DVD burner
Cynthia replied to leoliver's topic in ImgBurn Support
Try to use only this in the advanced setting string. SONY DVD RW DRU-720A -
-
Hi and welcome to the forum, reidneile! One difference that I can see is that you have OPC disabled when you burn with the old version and it's enabled when you burn with the latest version. Some burners can crap out if that setting is enabled. Try with the latest version and have OPC disabled. You find the setting in the Write tab in the settings.
-
The next version will allow you by a setting to have it as it was before in the old version. (The GUI changed).
-
'supported write speeds info' don't shows on v2.4.3.0
Cynthia replied to Monica Donosso's topic in ImgBurn Support
Hi and welcome to the forum, Monica Donosso! http://forum.imgburn.com/index.php?showtopic=9742 -
4. Tools (Continued) 4.3 Changer This function supports non-stop 'queued' burning from a changer device like the Sony VGP-XL1B2(3) and the Acronova 'Nimbie', Primera Technology, Inc. and the Vinpower Digital's RipBox, series of auto loaders. This function is not covered in this guide, but you can read more in these guides. How to get your Acronova Nimbie USB auto loader working in ImgBurn. How to get your Primera Technology auto loader working in ImgBurn. [*]4.4 Create CUE File... The 'Create CUE' function allows you to compile an Audio CD. A cue sheet, or cue file, is a meta data file which describes how the tracks of a CD or DVD are laid out. Cue sheets are stored as plain text files and commonly have a '.cue' filename extension. For an Audio CD, a cue sheet specifies titles and performers for the disc and its tracks as well as the names of one or more audio files to be used. Cue sheets are also used for many types of CD's in conjunction with an image file. The image file generally has a ".bin" extension. Layout Use the this button to browse to a folder and select one or several sound files that you want to be loaded into the track list. . Removes one or several selected tracks from the list. . Removes all tracks from the list. . These arrows allows you to move around the selected track(s) in the session track list order. Moves the selected tracks(s) to the top. . Moves the selected tracks(s) one step up. . Moves the selected tracks(s) one step down. . Moves the selected tracks(s) to the bottom. [*] Sorts the listed tracks in the tags track number order. . [*] Adds a session. [*]Disc/Session/Track Options PreGap PreGap allows you to see the amount of space (silence time) that should be before this track is played. If you want 4 seconds, then select the option 'Custom', and add the value 300 (4 sec x 75 frames). The default setting is '0 Seconds'. . CD-TEXT CD-Text adds the ability to store information like album titles, artist names, and song titles on an Audio CD. None CD-TEXT will not be compiled on your Audio CD. . File Name The name of your source file will be used as the tracks 'Title'. By pressing the refresh button, the name will be re-read from the source file. . Tag The current tag of your source file will be used as the tracks 'Performer' and 'Title'. By pressing the refresh button, the tag will be re-read from the source file. . Custom Allows you to set the 'Performer' and 'Title' to whatever you want. [*]Prefer Accurate Audio Track Duration This makes the program analyse the audio files properly as they're added to the list. The default setting is 'Enabled'. . [*]Preserve Full Pathnames Preserves the full path of the file. If you disable this setting you will only get 'My song.mp3' and not something like 'C:Desktop\My music\My Song.mp3'. If you want all the CUE files in one folder and the audio files in another, you need the preserve full pathnames option ticked or it won't be able to find the files (it only looks in the current folder for them). The default setting is 'Disabled'. . [*]Add To Write Queue When Done When the CUE file is created, you can automatically have it added to the 'Write Queue' list. This function is explained in section 2.4 of this guide. The default setting is 'Enabled'. . [*]Default CD-TEXT You can set the default CD-TEXT to be used when you import new tracks. Disc Available options are: None Tag Custom [*]Track Available options are: None File Name Tag Custom [*]Quick OK Saves the created CUE file to the location that was last used for adding a file and uses the first tracks title as the name of the file. If you want to decide the name of the file and where to save it, you need to use the 'OK' button to achieve this. . [*] Displays the compilation in a notepad window.. Note: If you right click in the 'Layout' box within the 'Create CUE File' window and when an audio track is selected, this will give you a list of the filters that DirectShow will be using to decode your file into a format ImgBurn can use. You can read more abut this function in the 'How to burn an Audio CD from music files using ImgBurn, Supported files include Ape, Flac, Ogg, MP3, Wav and Wma' guide. .[*]4.5 Create DVD File... . In the past the .DVD file was needed for mounting HD-DVDs and BDs when using Virtual CloneDrive. The file contained the MediaType of the ISO image and told Virtual CloneDrive what type of image it was mounting. Recent versions of Virtual CloneDrive now detects the UDF directly from the ISO image so the .DVD file is no longer necessary. The .DVD file basically contains this information: MediaType=[DVD|BD|BDR|BDRE|...] LayerBreak=1814800 [File Name].iso The .DVD file is also used to contain information used by CloneCD when burning DVD data to a disc; usually only a few bytes in size, but required to burn data to a disc; saved along with much larger data files, typically with extensions ".i00," ".i01," ".i02," etc. MediaType=DVD [File Name].i00 [File Name].i01 [File Name].i02 [File Name].i03 [File Name].i04 Use this button to browse to a folder and select one or several files that you want to be loaded into the program. . Removes one or several selected files from the list. . Removes all files from the list. . These arrows allows you to move around the selected file(s) in the list order. Moves the selected file(s) to the top. . Moves the selected file(s) one step up. . Moves the selected file(s) one step down. . Moves the selected file(s) to the bottom. [*]Layer Break LBA Set the LBA for the layer break position for a dual layer disc image. For Microsoft Xbox games it should be set to the value 1913760. The default setting is 'Disabled'. The Track Path options (PTP or OTP) are not available in the 'Create DVD File' function. . [*]Media Type Specifies the type of media that's been used to create the image. None CD-ROM DVD-ROM HD DVD-ROM BD-ROM BD-R BD-RE [*]Preserve Full Pathnames Preserves the full path of the included file(s). If you disable this setting you will only get 'Demo.i00' and not something like 'C:Desktop\My Movies\Demo.i00'. The default setting is 'Disabled'. . [*]Add To Write Queue When Done When the .dvd file is created you can automatically have it added to the 'Write Queue' list. This function is explained in section 2.4 of this guide. The default setting is 'Disabled'. . [*]Quick OK Saves the created .mds file to the location that was last used for adding a file and uses the first files name as the name of the file. If you want to decide the name of the file and where to save it, you need to use the 'OK' button to achieve this. [*]4.6 Create MDS File... This function is useful in three occasions. You have a set of files with extension like .i00, .i01 and miss the .mds file, which holds the information on the parts. You need to set the layer break for a dual layer disc image. You have an ISO file that is under 1GB in size, hence the MDS file is needed so that DAEMON Tools etc will switch to 'DVD' mode rather than being in 'CD' mode. Use this button to browse to a folder and select one or several files that you want to be loaded into the program. . Removes one or several selected files from the list. . Removes all files from the list. . These arrows allows you to move around the selected file(s) in the list order. Moves the selected file(s) to the top. . Moves the selected file(s) one step up. . Moves the selected file(s) one step down. . [ Moves the selected file(s) to the bottom. [*]Layer Break LBA Set the LBA for the layer break position for a dual layer disc image. For Microsoft Xbox games it should be set to the value 1913760. The default setting is 'Disabled'. . You also have the ability to specify the Track Path for a double layer image to either 'Parallel Track Path' (PTP) or 'Opposite Track Path' (OTP). ImgBurn can't burn as PTP, but it can make MDS files where a DL image has the PTP flag set. This MDS can then be mounted in DAEMON Tools and the virtual drive will then be emulating a PTP DL disc (rather than being forced to an OTP DL one). Replication plants or professionals with proper hardware / software could then use the virtual disc as the source for a client or whatever. PTP Dual-layer DVDs which have both layers recorded as clockwise spirals which start from the inside of the disc. . OTP A dual-layer DVD standard which defines layer 0 as being written in a spiral track starting at the inside of the disc, and layer 1 having a spiral track which starts at the outside of the disc. Both tracks are written so that the DVD player will rotate the disc in the same direction. This enables the DVD player to switch from one layer to another more quickly at the end of layer 0. [*]Media Type Specifies the type of media that's been used to create the image. DVD-ROM DVD-R DVD-RW DVD+R DVD+RW [*]Preserve Full Pathnames Preserves the full path of the included file(s). If you disable this setting you will only get 'Demo.i00' and not something like 'C:Desktop\My Movies\Demo.i00'. The default setting is 'Disabled'. . [*]Add To Write Queue When Done When the .mds file is created you can automatically have it added to the 'Write Queue' list. This function is explained in section 2.4 of this guide. The default setting is 'Disabled'. . [*]Quick OK Saves the created .mds file to the location that was last used for adding a file and uses the first files name as the name of the file. If you want to decide the name of the file and where to save it, you need to use the 'OK' button to achieve this. [*]4.7 Rebuild SCSI / ATAPI device map This function rebuilds the SCSI/ATAPI device map, so that ATAPI devices allows to be translated as a SCSI generic device and allowing ImgBurn to recognize it as a SCSI device. This function is only available in Windows 95/98/Me. . [*]4.8 Search for SCSI / ATAPI devices Searches your computer for installed devices, such as CD/DVD writers and DVD-ROM's. . [*]4.9 Automatic Write Speed... The 'Automatic Write Speed' (AWS) function is useful if you want ImgBurn to remember the default write speed for a certain brand of media or combination of media and drive. So you can set different default write speeds for the same media, if you have more than one drive installed. If you have added media in this function and want to use it, you also need to have write speed set to 'AWS' when you burn your discs through the 'Build', 'Write' and 'Discovery' modes. Settings Disc ID Insert a blank disc that you want to be added to the 'Automatic Write Speed' function. Press the button to load the current media's 'Disc ID'. You can also add 'DVD-R' and it'll burn all DVD-R (that aren't otherwise specified) at whatever speed you select. The same can be done for 'DVD+R'. . Write Speed Select the write speed that you want to use for this media. The default setting is 'AWS'. . Adds the loaded media to the list of media. . Updates your changed settings for the selected media. . Deletes the selected media from the media list. By selecting an added media you can add it to one or more drives. In this way you can have individual write speeds for different drives for the same media. Device Select the drive that you want to add a different write speed for, instead of the default one. . Write Speed Select the write speed that you want to use for this media, when it's burned with this drive. . Adds the loaded combination of media and drive to the list of media. . Updates your changed settings for the selected media. . Deletes the selected media from the media list for this drive. [*]View By This changes the view order, so you can see the media codes attached to your drive(s). Settings Show Non-Present Devices If you have added media for currently not attached drives, such as an USB drive, this setting allows you to see such drives also. The default setting is 'Disabled'. You can read more about this function in the 'How to use the 'Automatic Write Speed' feature' guide.
-
I can get it to work in Windows Vista. Do you get any error message or is it just not adding it? Are you running XP/Vista?
-
Hi and welcome to the forum, BINGS!
-
You can turn that one off in the settings Build tab -> Don't Prompt Image Details
-
Also shame on me for not spotting it, as it happens with all my burners. I'll put myself in the corner for the next hours.
-
Hi and welcome to the forum, Fastrat! Try to install the latest firmware for that burner. http://www.firmwarehq.com/Sony/DW-Q58A/files.html
-
Hi and welcome to the forum, Phi! I know that the author has the same burner (and installed firmware version) - iHAS 422 - as you have and no problems in those logs. Can you post a log from one of those burns?
-
-
Can you post the log of that burn?
-
Some new rows to translate, some are gone and some are changed - so yes - you need to update it. http://forum.imgburn.com/index.php?s=&...ost&p=90136
-
Latest firmware installed for that burner?
-
Even if you uninstall Daemon Tolls - the SPTD driver seems to be left behind. Atleast it did on my system.